
-

Big job,it won’t leak now sweet Hi from Monty we r in Saskatoon -10 here this morning cold last clinic of the year then holidays till March
-
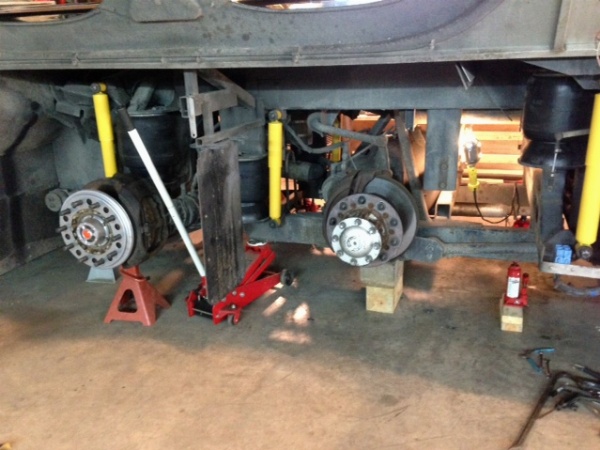
All done except for some TLC.. New bags, shocks, Norgrens, fittings and dryer cartridge, total cost less than 17000. And just for Jon, not a single leak…
-
Great job Tom. Thanks for taking the extra time to post and all the pictures.
-
Wow, that really looks good. You do nice work and pay attention to detail.
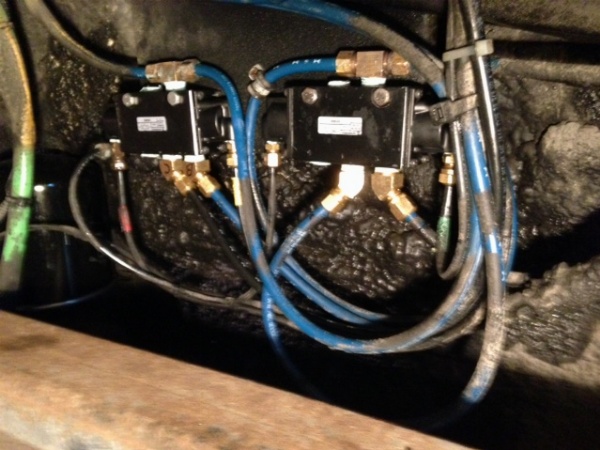
There is a cover plate on the face of Norgren valve. New design or your adding for protection ?
I see a shinny new Centramatic on the tag axle.
-
In about 2 years I have to do that. Or I could just put it off until the bus starts to lean.
-
Tom Did you install a centrimatic for each axle end for a total of 6? Rick
-
Yes Rick, one ring per wheel position, 6 total. The large one goes between the inner and outer drive tires.
-
The suspension rebuild is done and all is well, but it was a frustrating process. There were no external leaks on any of the fittings, but overnight the bus was leaning on the port side. The bus has done this before and I was hopeful that changing out the 5 ports and bags would solve the problem. For me, this was a PM procedure as the bags were 13 years old. I suspected a bag was leaking under the bottom fold that you can’t get to with soapy water. This is my 3rd bus that I’ve done the suspension and the XLII makes this much easier with the fold up fenders.
The only option was to isolate the various components to identify the probem area. This process is really well illustrated on Prevosts Level Low Webinar and taught by Robert Hitt and that was one of our seminars at Branson. Of course Jon kept me focused and having my suspension drawing blown up to 24 X 36 really helps. Liberty modifies the system for their auto level, so it took awhile to understand the changes made, but once understood, it’s easy to follow the logic. I also remember Robert saying “follow the air.”
First, isolate the air bag supply lines at the 5 port. One line sends air to the front drive bag, the other line sends air to the rear drive and tag bag. Each bag has a ping tank that could leak as well. So the front bag held it’s air with no problem using the gauge I made. The other line when pressurized showed a small leak over a couple hours, about 5 lbs, so I knew my problem was the rear drive and tag bag, ping tanks or 3 port Norgren above the tag axle.
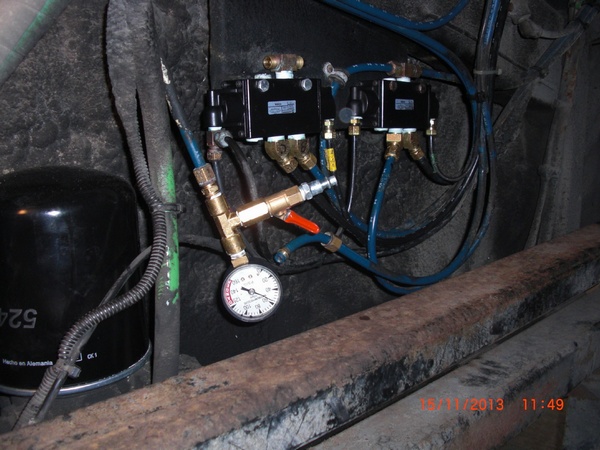
I removed the air lines at the 3 port and did the same thing. Pressurized the bag and ping tanks each and no leaks. Now I had it narrowed to the 3 port and thanks to Paul Horner, I just happened to have a 3 port in stock from when Paul sold his bus. Here’s is a picture of the culprit:
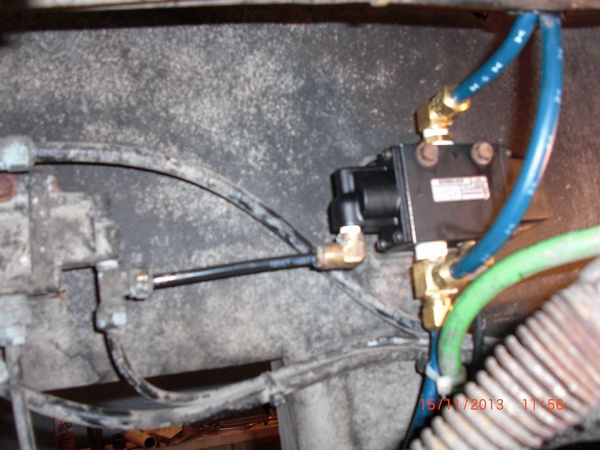
So now the bus is leak free and hasn’t lost air for 24hrs, I’m good to go. But I have to tell ya, that 3 port was a PIA and for a senior citizen to squeeze up over the axle and Liberty exhaust pipe while standing on your knee’s and reaching across the frame to work is painful! Even having a pit would still be tough. When the other side starts leaking, Prevost can do that one….
This was a long post, but I did it for those that have not seen the underside of their buses whether they work on it or not, at least maybe it will help to understand the components and the process of finding air leaks. If you have the leans, chances are they are in the components mentioned here, but could also be up front in the steering bay if the leak is getting passed the 5 ports.
Jon may want to add more comments, he’s more detailed than I am…. Also, the bus was properly blocked and braced, don’t ever get under it even for a nano second without supports.
-
There are a couple of lessons that Tom has offered in his posts. First, depending on how or where the coach leans it provides the information needed to focus on one relatively narrow area of the coach system. Tom’s leaned left so he knew the problem was in the rear left, from the 5 port Norgren back. The reason everyone needs to understand this is if you do not do your own work, and you hire someone to do the repairs you will be able to make sure they aren’t spraying soapy water on your brakes or fittings except in a very limited area of the suspension. In fact use the webinar Robert Hitt has prepared to help you understand the suspension.
The second lesson is not all leaks can be found visually. You can soap the fittings and components all you want, but some leaks are not going to show up because there are places the leaks will exit certain components and no amount of soapy water is going to show them.
Tom’s choice of a pressure gauge device is only one way to effectively isolate leaks. Hector created a device he calls a bubbler which is also 100% accurate. The thing to remember is whichever leak detection device you use there is no fast simple way to verify where the leak is. As Tom explained he started at one point and kept moving closer to the area of the leak by methodically verifying where the leak was or wasn’t. It takes time and is a sometimes difficult process, but even the smallest leak can drive you crazy so it is worth the effort to eliminate them when possible.
Notice Tom mentioned his use of the pneumatic diagram. The Prevost site has them available and you can have the PDF file blown up to a large size at Kinkos to make it easier to follow. That diagram is worth its weight in gold.
There is one thing every owner can be certain of. His coach will leak air and his coach will lean. This is one area worth developing a basic understanding of because it is as sure to happen as taxes. If you do have the leans use this forum to ask questions and to post photos of your process to isolate the leaks. The reason is everyone is going to benefit if this issue is discussed in detail. No matter how many times people ask the questions it is worth re-asking because unless you work with the coach every day it is difficult to remember all we need to know to make the coach more enjoyable.
http://prevostcommunity.com/PDF/How%20Does%20The%20Prevost%20Suspension%20Work.pdf
https://prevostevents.webex.com/mw0307l/mywebex/default.do?siteurl=prevostevents
http://prevostparts.volvo.com/technicalpublications/en/pneumatique.asp
-
Tom,
Glad I could help…..and I didn’t even have to get my hands dirty!
-
Great post and pictures, Tom.
I see colored tape marking disconnected lines…excellent
-
I would love to take credit for the colored tape big Al, but that was Liberty…
-
Great work and coverage Tom. Thanks for taking the extra time to educate us.
Log in to reply.