
-
Slide Leak
Posted by Bradley on October 27, 2015 at 7:14 pmI have a 2006 XL II and this past weekend we experienced massive water intrusion through the ceiling of the front slide. I just inspected the pneumatic seal and it is functioning properly. There was some debris (pine straw) under the seal which might cause a small leak but this was far greater. Upon further inspection I noticed that one of the roof panels on the slide was delaminated along the the outboard edge. What is the best procedure for re-attaching the panel. Since the panel and the frame are both metal, I thought about using JB Weld followed up with some 3M 5200 adhesive/ sealant. The other option I considered was the use of a strip of 10oz fiberglass along the entire leading edge of the roof panel. (just not sure if the fiberglass route would be too rigid and prone to cracking.) A third option is a series of counter-sunk stainless screws with 3M 5200 sealant.
THOUGHTS?
Dick replied 10 years, 11 months ago 6 Members · 9 Replies -
9 Replies
-

You have two issues that require almost immediate attention.
The first is relatively easy and you can do. Deflate the slide seals using the control that is likely in the 3rd bay, driver’s side. It is a 90 degree turn valve. Mine has a red handle and may even be identified as the slide seal control. Then using a flat piece of plastic or something that will not harm (by cutting) the slide seal insure there is nothing under the seal. This should be routine if you believe leaves, pine needles or any other debris may have gottin on the slide roof.
The second issue sounds from your description like a delamination issue and this is far more serious and requires a complex procedure to repair. Prevost has a means of dealing with delamination that is a permanent repair and they may actually participate in the cost. But you have to take the coach to a service center, have Prevost do a full inspection and the results will be forwarded to Canada. You will then get an estimate along with their offer, if any, as to how much they will pay for the repairs. In most cases they absorb 100% of the cost of skin repairs, but you have to pay for paint work, if any.
This may not be good news, but it is how it has been addressed.
A skin or slide seal leak is a serious problem and if allowed to continue is almost going to lead to mold and mildew which left with a moisture source may propogate to the extent the coach may be damaged beyond repair.
-
Thanks Jon… Good to know that Prevost has a warranty that covers the possible delamination. I did clean the seal as described and it seems to be in good shape. We deal with water intrusion on our boat and you are right about the mildew/ mold danger (especially in Florida). The first order of business when we returned was to isolate and stop the leak, then we fired up the AC and supplemental dehumidifiers! (mildew and mold have a hard time at 65 degrees and 35% relative humidity) I will post the results of the fix after we contact Prevost in JAX.
-

BTouchstone,
Don’t confuse what Prevost is doing with a warranty. There is nothing written, it is on a case-by-case basis, and is primarily marketed as good will. Older coaches are getting less contribution, if any. Please consider adding your coach details to your signature.
Tradewinds Coach
Kyle Bennett (Service)
Brian Miller (Sales) -
That signature is pretty good. But it has us wondering what your first name is, what is “Texas Custom Coaches”, and how did you come to name your coach “Bridgit”.
Is a sheet of aluminum deliminating from the steel structure of the slide? If so, an experience I had last week with my enclosed trailer might be of interest to you and others.
I took delivery of our new 26′ Bravo enclosed race trailer the Friday before Memorial Day using the Prevost as the tow vehicle.
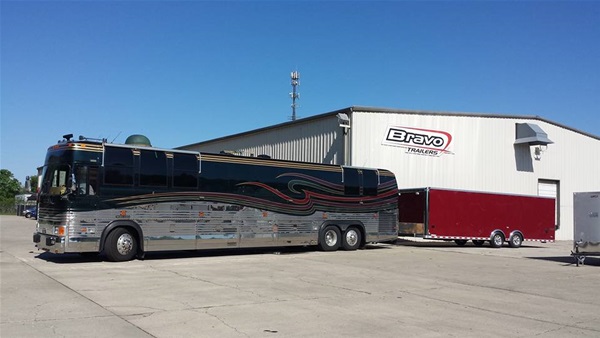
A month ago I had the local dealer add a 36″ flap to the ramp door so that it would be easier to get the race cars in the trailer. While attaching the new flap, the technician accidently damaged one of the aluminum panels and it had to be replaced. Since I had ordered the trailer with the screwless sides, removing and replacing this panel was going to be difficult. The aluminum panels has been appllied using some kind of adhesive tape; double-sided, 3M adhesive tape. VHB tape:
http://solutions.3m.com/wps/portal/3M/en_US/Adhesives/Tapes/Products/~/3M-VHB-Tape?N=6105&rt=r3
To remove the damaged panel, the tech used a propane torch and a sharp, stiff putty knife. The heat loosened the grip of the tape which allowed the putty knife to separate the panel from the steel structure of the ramp door. Unfortunately the “bad panel” was overlapped by an undamaged panel. The tech used the propane torch and the putty knife to carefully separate the good panel from the bad panel and separate the good panel from the next steel tube over (12″ I think) to get room to work.
Once the bad panel was off he used a solvent or thinner to clean adhesive from the steel tube in the ramp door that the adhesive tape had been on. Then he took an angle grinder with an abrasive wheel and “cleaned” the steel tubes off. More solvent and then rubbing alcohol (isopropyl alcohol?) to get the surfaces of the steel tubes as clean as possible for the new adhesive tape.
Then he put the 3M tape on the steel structure of the of ramp door. An important step he said is to rough up the back side of the aluminum panel with a Scotch-Brite pad to give the adhesive tape something to grip. Once on, the tech took a roller to the aluminum panel to ensure the 3M tape had adherred properly.
Then it was time to address the “good” panel that had to be released to replace the “bad” panel. He cleaned all the mating surfaces, roughed them up with Scotch-Brite, applied the tape, laid the aluminum panel back down, rolled all the mating surfaces, and called it done.
Can’t tell that the good panel was pulled back. Everything looks like new from the factory.
What I learned from watching the tech is that the 3M VHB tape can be “released” with heat and the panel be reused. It’s also very important to properly prepare (“rough up”) and all the surfaces to be mated and joined with the tape.
Having not seen first hand how aluminum sheet was fastened to square steel tubing with the 3M VHB tape, I might have gone down the JB Weld/fiberglas route to fix a leak like the OP has. But having seen how the VHB tape can be released and redone, I would be reluctant to try JB Weld or fiberglas.
Keep us posted on how the fix goes.
-
Here is the skinny on the name… Texas Custom Coaches is the up_fitter that did an amazing job putting her together. The coach is named Bridgit because I design signature bridges throughout the U.S. (www.touchstonearchitecture.com) I use the coach (with a driver) in lieu of flying and love the productivity and comfort! Bridgit has nearly 600k miles and is as solid as a rock!
Tip of the day…no one can find better parking than a driver hat has toured with rock bands for 20 years.
-

Very interesting. I’ve never heard the term “signature bridge” before. When I saw the name of the your web site including “touchstone” I thought that was a contrived name for the firm. But what a interesting last name for an architect. Thanks for sharing. Now understand.
Log in to reply.