
-
Replacement of 2 Atwood water heaters
Posted by Michael on April 25, 2017 at 10:29 pmWell, anyone that knows what I’m doing knows this is a challenge. Hours getting the old H/W and not to my surprise found the foundation swollen and rotting. I’m going to have to put a new floor. Thinking of a aluminum over plywood but I’m willing to take suggestions. Had to cut bracket as well. What a mess but should be rewarding after complete. Took the Pres’s advice and went with two new Kuuma 11 gal with front exchanger connections. Here is a nasty picture so far.
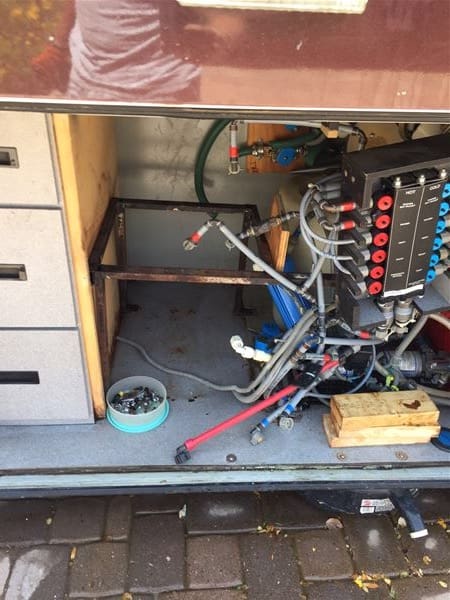 Mike replied 9 years ago 14 Members · 30 Replies
 -
30 Replies
-

Use a marine grade plywood and you should be good to go….enjoy the task of getting everything out so you can replace all the flooring in the bay…..
-
Thamks Jeff and thanks for your sponsorship on the all you do for us here. I wish I could have travelled to Belle last week and met you.
It appears that the laminate and ply wood are to the left of the hose reel drum and all pumps. I was hoping not to have to pull pumps hose reals etc out. I would really like to put marine grade plywood down (where does a guy get that?) and possibly aluminum or stainless down. I have to change the laminate on the section of the front if not all front pieces from water damage and thought alum, diamond plate or stainless. Is it possible that the plywood is not under the aluminum on the right side of the bay?
Thanks again Jeff
-
Michael,
Take thie time to be certain the diaphrams on the water pumps are not leaking. If so, they are an easy replacement with everthing out. It will be obvious to the naked eye as to whether or not they are leaking… I took out the metal platforms that support the pumps and ground off the old rust, repainted them, etc., and then reset them. IT also gave me the opportunity to spray additional protection on the floor under all of the connections.
If you look at the picture I sent to you, the area that runs along the bay in front of the water bay can be redone simply by cutting a board to fit and and snugging it up against the water closet after installation. I covered mine with carpet and stained the wood part that shows. It will really finish off the project.
On the measurements, be certain to reset the heaters “back” leaving as much room in front as reasonably possible as we discussed. That will allow the front exchanger hoses to fit. I also put a sheet of insulation between the front panel and the water reaters… not necessary but I did so.
As you complete the installation, you might want to make a “trough” out of insulation that runs across the bottom of the heaters under the connections. I did this in a manner that would cause any future leaks to at least be directed out to the outside of the bay for early detection.
Best to you,
Pres
-
I’ve never done this type of stuff before but me and my buddies are getting our fill after work. Supid quesion… What does the pump diaphrams look like? Are they the clear looking “Shot Glass” thingy ma jigs?
Thank you Pres…
-

The diaphram is the black portion of the pump that makes up the front 1/3rd of the pump. You will see there is a “seal” and the two parts are held together by screws. If the pump has age on it, there will probably be some gray material around the seal reflecting leakage through time. When the seal fails, it leaks from this gasket area usually.
If you replace the pump, you can replace it with the same gallons per minute pump by researching it on-line. I took the opportunity to upgrade to a slightly larger pump that had the same connections and measurements.
Pres
-
What about “KingStarBoard”? Its billed as the “The Original Marine-Grade Polymer Sheet.”
http://www.kingplastic.com/products/king-starboard/
Appears to be the “go to” product for all kinds of boats and yachts.
I wonder if Jeff Rowe has an opinion on using this material vs marine grade plywood. I would think that KingStarBoard doesn’t need to be finished, saving a step.
-
I had to strip the water bay in my 97 last year due to a slow leak and rotted floor. I removed all the ply and replaced with marine grade ply. After cutting to fit, I pre-drilled the holes and counter sinks for self tapping screws and then used marine grade epoxy on all sides of the ply. If I have any undected leaks then that should prevent future wood rot.Looks good to, no need for additional floor coving which can trap water.
My 93 chassis had butyl tape between the floor support and the ply. I replaced that as well. Talk about a tacky mess!
I got the marine grade ply at a home depot near a major lake. My local store did not stock but one 50 miles away did. You can check in stock location on line. It will take 3 sheets.
While every thing was out of the bay, I opted for dual water pumps and replacement of the holding tank valves, rubber gromets, rubber pipe couplings. It was just easier putting things back together with new parts than having to replace a leaking one later.
good luck, its a big job but doable.
-
king Star Board. I’ll check that.
Epoxy paint is exactly what I was going to do. Miy bus has a sheet of aluminum under the power cord drum and the pumps and all the electric valves. I was almost able to get the drawers out but could not until I cut out the steel rack. Oh my Sweet Jesus this is something. Pictures tomorrow might look like I don’t know what’s going on. He he! I don’t but I’m doing it.
-
Jeff was right I would have fun getting everything out. Wow was a mess. So much rot that anything attached to the board was not. And the stainless bolts going through the entire bay was not fun getting out. Pumps look fine based on Pres’s suggestion to look for seepage on the pumps. I might replace them anyway. They are both Sureflow I think. Also thinking of putting a new shoreline water hose on the reel since that thing is out too.
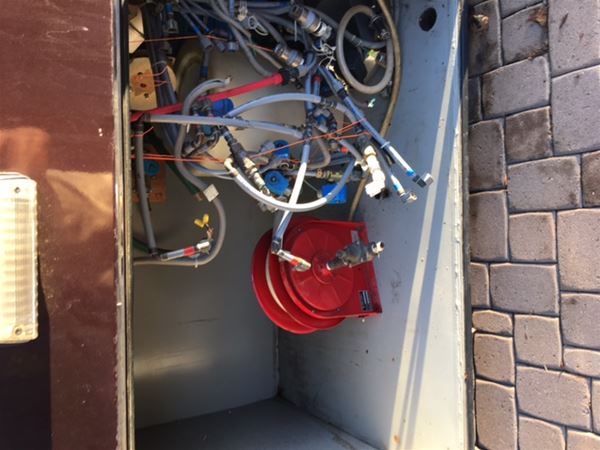
Going to use plywood wood cut to perfection and sealed completely with epoxy paint. Then I’m going in with two aluminum restaurant pans one under the stacked new heaters and one under all the stuff on the right side of the bay. I would like to have an aluminum welded drain put in but need to research that a bit.
Here is a pic of the rotted floor and the bay that has been cleaned with one pass. Got tired since I’ve been at this all day.

-
Michael is not alone in having this problem.
When converters cover the plywood bay floors with aluminum or plastic surfaces and leakage, whether from a tank or water fitting ends up between the floor surface and the plywood. Instead of evaporating the moisture is trapped and the plywood starts to rot.
I had the same type of damage on our first coach as a result of failed welds on a water tank that allowed a very slight but constant seepage leading to the rotted floor. The damage was not seen until the leak was noticed and I pulled the tank to reweld it. When I lifted the plastic floor covering there was almost nothing left of the plywood in spots.
The only prevention is to do a detailed inspection of the water bay periodically and even then there is no assurance a minor leak will be seen.
-
Another good reason why to replace your WH based on age, before they start leaking!
-
Mchael
You are my hero !
It is fun watching the pictures….
It will look great when completed….
Pres
-
Couple of questions. Does the replacement for the Atwood bolt up as a direct replacement or are there snags? I am mainly concerned about the 12V control wires that Atwood uses on the front of the unit. (Kuuma)
Second, regarding the Shurflo 2088’s that CC used forever…. I have replaced the heads several times because the diaphrgam fails or leaks but also the pressure switches. Cheaper for me to replace the entire head and you can get them in two days from Amazon.
I replaced one of my Atwoods (EHP-10) a couple of years back, the other was fine. Since Dometic has purchased Atwood I am concerned. First, that model is no longer made and second…..well, you be the judge. Remember the Fantastic Fan was guaranteed forever….that is until Dometic bought them…..
Finally the CC use of QEST butyl pipe and fittings. This is a PITA. Has anyone adapted newer hose? I know that QEST was one of the first but, for openers, I loaned out my set of pliers that set the infamous rings a couple of years back, never to be seen again and I do not want to spend a hundred bucks on pliers for obsolete plumbing..
Thanks in advance
Log in to reply.