
-
Need to Replace Hose(s) (And Fittings?)
Posted by Susan on July 10, 2013 at 6:46 pmHello, dear Prevost gurus,
Cutting to the chase:

Ya think the hose on the right needs changing? 🙂
Some questions for you, if you would:
1. This big hose seems to feed the auxiliary tank. I am not sure whether my ’96 coach has the upgrade you mentioned, Jon, in another post, where the aux air no longer levels the suspension constantly as before. So I am wondering whether a) the suspension will lose air if I remove this hose and b) I should worry about it if it does. I mean, I am not sure whether the shocks/springs/or whatever-there-may-be would protect the coach if I don’t have it on a lift.
2. Do I need to replace the entire fitting/connection/thing (brass+hose) or just the hose? And what is that yellow thing, please?3. On another hose on the same compressor, in the second picture, are those crimps serious enough to warrant replacing that hose? It wouldn’t be a big deal to replace the hose, I am just hoping for some general advice about crimps. And again, if I replace the hose, is it a good idea to replace the brass part as well?
Many thanks for hand-holding again, Susan
 Thad replied 13 years, 1 month ago 22 Members · 63 Replies
 -
63 Replies
-

Susan,
First I assume the aux compressor that appears to be in the photo is accessible without getting beneath the coach. But I am not clear if you can access both ends of the hose that needs replacing. For this discussion I assume you can without getting under the bus.
In most cases if you disconnect hoses from the aux compressor a check valve will prevent the loss of aux system air, at least at the compressor side of things. It is probable if you disconnect the other end of the hose that you say goes to the aux tank you will lose aux air and some brake system air as it bleeds down to the protection valve pressure. But if you key is off and you have the suspension system logic in which the bus still sits up even with aux air at zero the bus should not move. But if you are not under it anyway if it does drop, let it. There will be no harm because the air bags have internal bump stops. I suspect your coach is a late enough model to have the logic that allows a zero aux system pressure without losing suspension system pressure. I can’t say for sure because your age is close and your chassis might be using the old logic.
I admit to never seeing a hose of that nature feeding a bus system (the aux air system). All “hoses” should be DOT plastic (nylon) tubing. The only flexible rubber hoses I would expect to see are those that flex as they go to the brake chambers.
So when you get that hose off, discard it and use tubing of the right size and compression fittings that are DOT approved.
I would also replace the tube with the nick in it, but if that is not possible remove a short section where the nick is and use a compression fitting connector suitalble for the hose size. As to what you call “brass parts” the fittings are generally threaded where they go into something like the compressor or a valve, but are “compression” at the tube side. When you remove the nut on the tube side there will be a ferrule or a small brass part that slides over the tube. Once it is on there it is not removeable, but the tube will pull from the other part of the fitting. Once you get a wrench on the fittings you will see what I mean. Those fittings are readily availble from NAPA or other supply houses. Just don’t get them at Lowes or Home depot.
-
Ditto what Jon wrote.
Look back at some of the old posts in the pneumatic section where it talks about air check valves.
In my lAux air leak repair my old air check valve was leaking lots of air back through compressor. WW Grainger Co. has a few on there web site.
-
Hi Jon,
Thank you very much for all this information. Yes, the auxiliary tank is accessible. It’s in the front storage area. I just unlatch and lower the bumper. I’m sure you know what I am referring to.
Thanks for the info about the bump stops. Whew.
I will get to work on that flexible hose first thing in the morning. FYI, I believe all the other hoses are a hard (not so flexible) type, probably the DOT plastic (nylon) ones that you mention. And this is the only one that is so big around. The others are thinner.
Not to worry, I have internalized all the warnings from you about never getting under the coach unless it is properly supported (at the right places on the chassis). And I never will!
We’ve got a NAPA in town, thank goodness.
I will let you know how it goes.
Susan
-
Hm…looks like you can’t tell what the “Aha” in my reply was in response to. It was your post, Al. 🙂
Thank you, Susan
-
Susan,
When you start the project, just so you don’t have anything you don’t anticipate happening just lower the coach, and then bleed all the air from the aux system.
Releasing air from the system by loosening fittings is also a good way to do it rather than bleeding air, but I prefer to control where and how to release system air because at full pressure an uncontrolled release of air not only surprises me, but it has the potential to blow stuff in your eyes.
-
Susan,
The yellow ring is what you’ll see on a fitting that is typically used for hydralics hoses and is a push on type fitting. You won’t be reusing it.
-
Took a look at your first picture again this morning. Enlarged picture showing connection on the left which looks like a coupler out of the 3 way brass block.
Examine that fitting as it might be an air check valve. On the other end of your rubber hose most likely is another check valve.
With new hoses, fittings, air check valves your Aux compressor should run a lot less time.
Another suggestion is not to use teflon tape on the new fittings. Reason, small pieces sometimes get separated from the main piece, travel inside hoses finally caught preventing a valve from opening or closing tight.
Using white high temp pipe thread sealant in my opinion is a better choice. NAPA has small tubes in blister packs.
I prefer small tubes as the product is fresh, easy to handle, cheaper then buying by the can.
AL
-
Many thanks for all these additional tips.
I have been trying to post a follow-up question about a check valve and been having bad luck posting pictures. Here goes a third or fourth try….
No…no luck. I keep getting this error message:
The following error(s) occured:
• (21) An error has occurred while saving the file ‘rad8A5DC.tmp’ in folder C:Inetpubvhostsprevostcommunity.comhttpdocsforumUserPics. Maybe you don’t have the proper permissions.
I had “proper permissions” day before yesterday. ??? And I am logged in. Oh well…I will keep trying. I have turned off my Mac laptop (not just restarted). No dice. I thought it was because I renamed the picture files…hm…but I’ve done that before. Oh well. I will keep trying…
Meantime, let me just say that I removed the hose and (numerous) fittings yesterday and took them to NAPA. They had everything except the check valve. I looked online at WW Grainger and they don’t have one that looks like mine.
I managed to break mine while twisting it off yesterday. So I must get a new one (would have wanted one anyway). I am not sure which of the ones offered at Grainger would be good. They don’t resemble mine in any obvious way (size, shape). The one I have is a 1/4″ T check valve with a little ball on a spring that sits inside a plastic piece.
Could anyone recommend a replacement just from this description?
I will keep trying to send a picture of the one I have….grrrrr….dealing with computer interfaces can be as frustrating as chasing leaks. 🙂
Susan
-
I had replaced mine with the one available from Grainger.
Suggested by PC members that the Grainger 250 degree rated was not the best check valve if placed next to the compressor. Heat is the problem and concern.
Back on the pneumatic post for air leak repair is a post about a Minnesota company that makes check valves.
I had a custom 450 deg rated check valve made for my application. It seems to be working fine.
My AUX air leaks down about 10 lbs a week now. Fixed about a dozen leaks spenting around a grand.
Most money went into the tiolet air leak repair as the parts very expensive, over $500
-
Goodness, that toilet really deserves to be called a throne.
10 lbs. a week sounds like heaven.
I notice that I can see icons in this browser again. They were not appearing earlier. So I will try again to put up a couple images of the broken check valve.
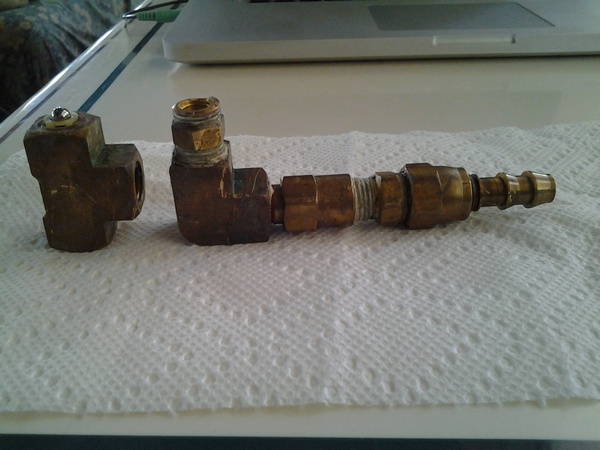

So then, the biggest concern in choosing a check valve is the temperature rating? Got it. Well, this particular check valve was, as it happens, not near the compressor itself but on the tank. (The compressor is in the steering compartment and this tank is in the storage area behind the front bumper. The big rubber line that I’m replacing goes from the the compressor to the tank.)
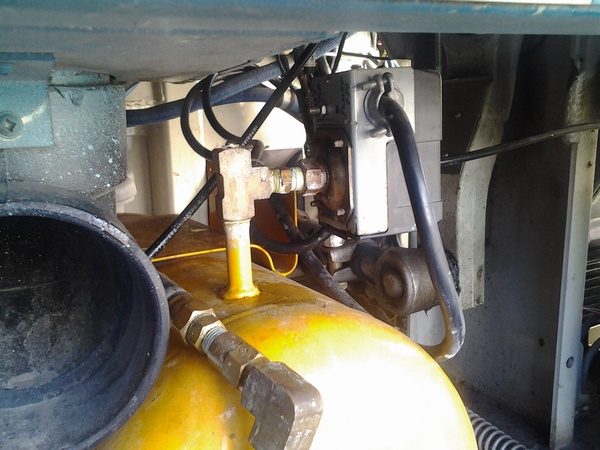
Here’s a picture of the tank with the bottom of the check valve still screwed in (the silver ball is sticking out of the top of the valve, just barely visible in this picture). I pulled off the top of this check valve with a wrench. 🙁 That part is hanging off the end of the rubber hose, which is resting on the tank (to the left of the check valve, chunky elbow + other fittings, still attached to the rubber hose). Then too, a pressure regulator (I think) is attached to the other opening on the check valve.
To the best of my knowledge (zippo right now), there was no check valve at the other end of the rubber hose (going into the compressor). I will verify that and make sure there will be from now on. And I’ll be mindful of heat rating for that one. Wow, I would never have guessed that 250 degrees would be considered low! So thanks very much for that info. I’ll look for the old message about custom valves too. I have been reading old messages but hadn’t gotten to that one yet.
I’m learning a lot. For example, that a grand spent in fixing about 10 leaks is getting off cheap. 🙂 Thanks,
Susan
-
Susan et al,
The check valve is actualy like wearing suspenders with a belt. Most compressors will not allow air to flow back through them after they cycle off but adding a check valve to the circuit assures the aux system will not leak down through the compressor.
The check valve where located is the best possible place because it is the furthest possible from the compressor. The heat of compression is greatest at the compressor outlet and it is usually too hot for most valve seats. Some install copper tubing from the compressor so the heat of compression is more easily transferred to the atmosphere.
The bus engine driven compressor has its discharge air delivered to the air dryer through a very long stainless steel braided air line so the air is cooler when it enters the dryer so if you have an opportunity consider copper tubing perhaps with a couple of loops in it from the compressor to the tank. Nylon DOT tubing might not be acceptable for the heat generated which might be why the hose was of the material shown. But you know how the heat impacted the life of the original hose.
-
With the check valve located down stream from compressor I believe the Grainger parts would work fine.
When I checked with Marathon service, they use the Grainger valve. When looking for Convertor AUX air leaks that check valve would be on the top of my list. The amount of air that valve if defective can leak down is substantial. Your not aware that it’s leaking without setting up a test isolating the valve.
That box located on top of your tank is the “cut in-out pressure switch” which signals the compressor to turn on.
When your system is back together you can verify the working pressures. Should be 85 psi on….120 psi off. The low setting is your choice based on demands to have ample supply ready. Some set the low side lower so the compressor cycle is less, owner choice.
This pressure switch is normally trouble free with a long service life and can be adjusted to your needs.
Your choice on the low end for cut-in but on the high end most would agree 120 psi is the “cut out” max.
Here is the Missouri my list in order of where to start finding air leaks.
A) Aux compressor check valve. If over 3 years old it leaks due to moisture, heat, micro dirt.
B) SMC regulator adjustable valves, # 1 target ……generator bay (heat issue) If you replace this valve it must be replaced with the exact replacement number.
IMPORTANT >>>>>There are two types used thoughout the bus which in generator bay this valve keeps constant 25 psi. As temp rise it discharges excess. If you install the wrong replacement valve air will expand and your mini air bags….well something has to give.
C) mini air bag regulator located in engine bay. Also add a check valve in service line which will keep pressure in mini bags for long periods. Prevost service put me on this one. This is not on convertor air list but can be a source of air leak down. The check valve here keeps mini bags tight now. Prevost stated there should of had a check valve installed here from the get go and is routinely added now.
D) SMC canister filter and auto drain valve located in service bay under drivers seat. Ours leaked from the bottom sight glass canister seal. I had it rebuilt but one day with the electronic leak detector picked up positive leak. Again the lower seal was leaking. Replaced with new style which had been improved by SMC.
E) Any junction where multiple connections are located. I believe the wiggle and shake puts stress on connections causing minor leaks, especially push in fittings.
F) Air toilet, obsulate type now but there are lots of them still in service. When finally located
malfuction of valve assembly leaking air into hopper, very rare I’am told.
Enough for now…grass needs cutting.
-
It is clear Al has become the Marathon leak repair guru. I do question how much air pressure our aux systems require. When we are driving the aux system is getting the same pressure as our brake systems somewhere around 120 to 125.
But when we are parked, those of us that need to maintain aux system air pressure, such as for pocket doors or a toilet or generator air bags or any other converter installed device, it is probable we all can get along quite well on a maximum of 60 to 80 PSI and a cut in pressure of 40 to 60 PSI.
The compressor will run less, it will not get as hot as with higher pressures, and if you do have leaks you haven’t yet repaired the leak rate will likely be reduced. Unless you need to level the coach without runnning the engine there is probably no harm in lowering the pressure switch pressures.
-
Thank you both, Jon and Al, x 80. Very happy to know all this.
My compressor is going off at 90. I noticed that the other day but have not yet noticed where the cut-in is set. This conversion does not have any pneumatic doors and toilet is a gravity electric Morphor (I know I miswrote that) that has been great. (Demons, get back.)
Sooo glad to know that a Grainger will work on the tank.
Will write again with my latest development. Thank you again for this fantastic help.
Susan
Log in to reply.