
-

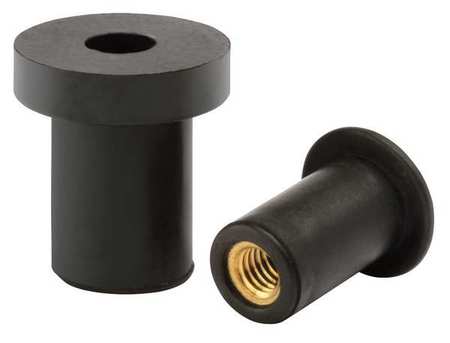
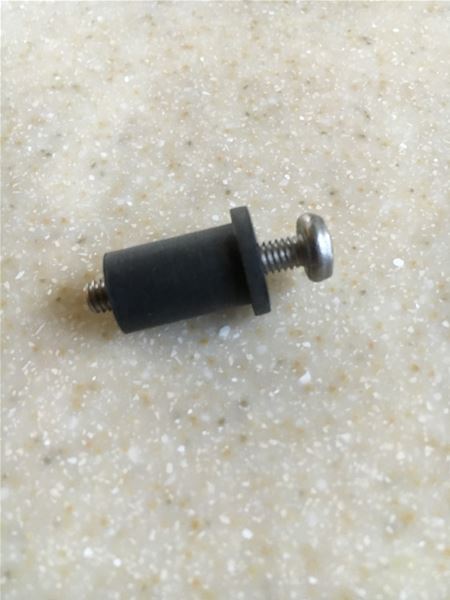
Charles those well nuts like in the pic are just pushed into the hole that is in the skin of the coach
-
Charles: Our coaches are pretty close in vintage and came from the same shops in North Chicago. The original owner had our coach for something 14 years that ended six months before we bought it. I talked to the original owner and he told me that when it was in Michigan it was in the large truck shop at his beer distributorship, when in Tennessee (near his second home) it was in his huge toy box … hardly spending any time outside during those years and the 72,000 or so miles he put on it. You can imagine my surprise, amazement, and puzzlement when I took the lense off an apparently burned out marker light. I could not believe the rust on two of the screws, while the other two were clean … hmmm … how does that happen.
The first screw came out completely with a little effort. I broke the head off the second. The clean, non-rusted screws came out pretty easy. I realized then that the clean ones were probably stainless steel and the rusted ones were poor quality plated or galvanized (however they finish them). I was more than miffed that Prevost would use that kind of hardware on their coaches in an area so vulnerable to water, rust, and corrosion.
I decided to replace the rusted screws with stainless steel screws. Big mistake. After double and triple checking I had the right thread size (8-32 if I recall, don’t quote me, do your own due dilligence). The screw started going in fine, then started to tighten up, and suddenly it snapped off. Now I’m PO’d. One screw snapped off about level with the stainless steel sides of the coach and another with the head rusted off. So I put the lenses back on (its held by the non-corroded, presumably stainless steel screws) and ran with a light out. Because of the location of the holes and the lights on the side of the bus on the stainless panels, I was very afraid to venture much further.
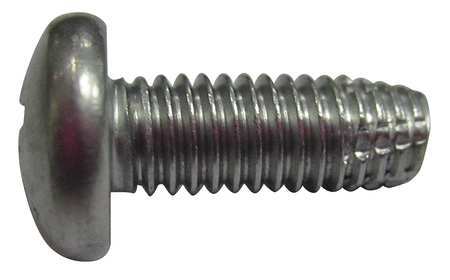
Fast forward to the PC/ETLC Maintenance Seminar. I meet Bill the Chrome Man. He explains to me the corroded screws were originally “thread cutting screws”; not regular screws or “self tapping”. Apparently there is a difference in the shape of the thread which is why the SS replacement screw tightened up and being brittle I broke the screw off. He showed me a self-tapping screw which has little groves (presumably for cutting threads) at the end of the screw perpendicular to the shaft of the screw. Last week I noticed our local ACE Hardware store had “thread cutting screws” in the nuts and bolts area. Previously in my then 62 years I never knew “thread cutting screws” existed. (See picture)
Bill also clued me in on the two non-corroded screws for each light. They are installed in something called a “well nut”; something else I’d never seen! (See picture) Apparently the idea is for tightening the screw which draws the rubber up on the back side, seals the hole through the stainless panel, and holds the light housing up against the stainless panel of the coach. Because of the rubber structure of the “well nut” it isn’t an effective ground, that is probably what the corroded screw is for. If the rubber part starts to spin, you might have to figure out how to grab the rubber flange in “our side” of the light base and then turn the screw.
My neighbor is a pretty handy nice guy, but is afflicted with a very serious case of tool-itis. He came over with a tiny Vise-Gripe pliers with very small jaws that we were able to use to grasp the tiny stub of the screw sticking out of the stainless panel. He also gave me a couple of very small left had drills to drill out the screw if it comes to that, as well as a tool with a point that when struck with a hammer tries to spin to the left (backing the screw out of the stainless panel and loosening it).
The process is frustrating and time consuming if you’re going to replace the marker lights. Bill sold me new lights for all the marker lights on my coach last summer. I had pulled some of the lenses off and most of the original bases are corroded and likely won’t work properly much longer, so its time to replace.
I’m actually really surprised that Prevost would use such a method to attach the market lights on their otherwise finely built coaches. I wonder how the marker lights are secured on the current model coaches. Maybe Mr. Mark would take one of the lights on his almost new coach and tell us how they did it (just joking Mark!).
I hope sharing my experiences helps you! Keep us posted.
-
Charles when you put new well nuts in if they spin do not do what Dick said to do and hold with pliers you can get one size bigger well nut and it will not spin , if you hold the well nut with pliers and do get light on if you ever have to take it off it’s a F***** to get off just get one a little bigger
If I was at home I would send you some I have two boxes of both sizes
-
Thanks Peter! I never thought of using a larger size. Good tip.
-
Charles, the gasket I used is the only one available, but if you look at the new (and old) top lenses, there are slots at the ends, and no gasget is going to seal it. the inner gasget does the real job of sealing the electrical connections and the coach. I guess some dust will get in there, but I do not think it will hurt anything.
My vintage coach only had the gasket behind the actual light base and all has been good since 1990.
I’m sorry that everyone has had trouble getting out the screws. I was oblivious to that problem. Every one of the screws on my caoch came out like they were installed yesterday. Go figure. Prevost installed them in 1989.
hope to see lots of you at Bella Terra
-
Peter,
Ye, have plenty of well nuts from my collection of motorcycle parts. Used them on all my windscreens for race bikes, May even have the right size in my stock that i picked up from storage a couple months ago.
What’s interesting is that the one that I am having issues with had the lense replaced with a different one from all the other (stock ones, as they all say made in canada) ones.
-
Completed one side today. Was a bear due to pretty much all the screws being rusted. Some I could break out the old light base and grab onto the rusted screw heads with a pair of vice grips and unscrew them, but some required drilling out broken off screws.
Hopefully the other side wont be so bad 🙁
Some of the fixtures were pretty much done and I am still surprised the lights worked. Tested the completed side and all lights work as well as directional signals.
Did it all proper like. Soldered the leads and heat shrunk the connections. The new lights and lenses really made a difference and I will feel a little sense of security knowing I have all stainless steel screws and sealed lights with very little chance of the fixtured rotting out. Should be good for many years to come.
What was odd was the two back lights (red botton and amber top) both had different screws then all the others. Instead of self threading 8-32 screws like all the other lights, it was using self tapping sheet metal screws with course threads? Not sure if this was from prevost or was someone doing it after the fact. The top back amber light was also the one that the well nut was messed up. Replaced the old well nut with a new one and all is good now.
Only had one light that I couldnt get both screws backed out or drilled out and had to go with a single inner screw, requiring me to turn the LED base around to get it grounded on a single screw.
The worst fixture. Not even sure how it was working still?
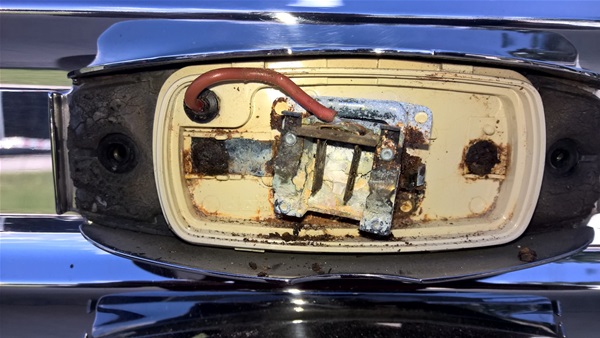
soldered and heat shrunk wrapped, ready to install
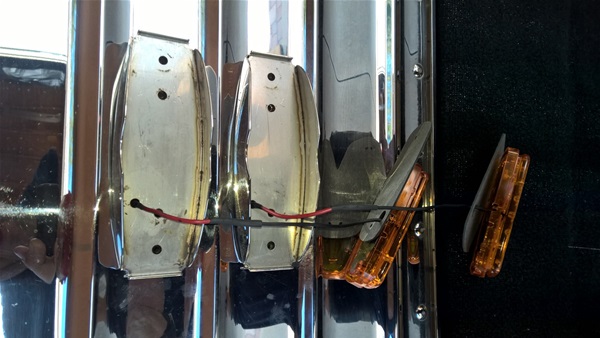
LED based installed.
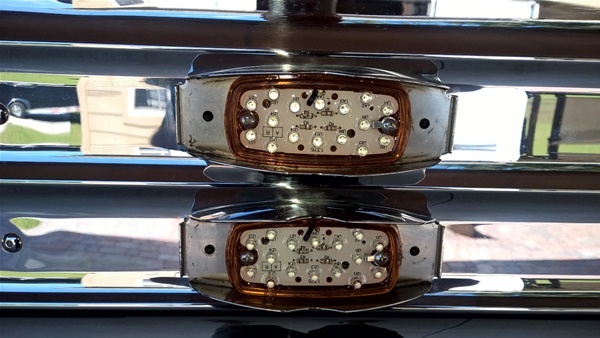
Completed lights.
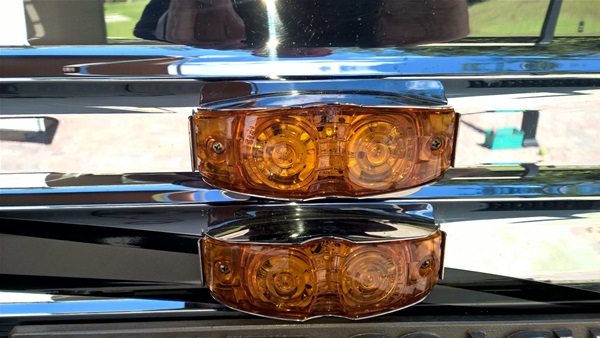
brighter, people will see these when while driving at night (passanger side done)

Driver side not done yet.

After I complete the marker lights I will turn to the head lights and front turn signals. Have some ideas for the turn signals, which include stainless steel curved inserts with LED round amber lights mounted in the SS inserts. Head lights will be done using new Ford buckets/lenses and upgraded HID/LED lights being discussed in the other thread/PDF document.
-
Bill wrote: ” Every one of the screws on my caoch came out like they were installed yesterday. Go figure. Prevost installed them in 1989.”
Could you tell if all the screws were stainless steel? That might have made the difference.
-
I have dealt with the rubber encased threaded inserts and thread cutting or sheet metal screws on side marker lights. None of my screws have been stainless. All have had some amount of corrosion. Almost all came out, some a little more difficult than others but the ones that gave the most trouble were those in the rubber inserts and I think that is because the threaded area is brass and galvanic corrosion formed a bond between the screw and the brass insert.
It just takes patience, a few four letter words, vise grips, a good screw driver and time. I think as our coaches age we experience issues like stubborn fasteners, but keep in mind that Prevost is building for seated coach operators and in 10 or 15 years of age those coaches might likely be pulled from service. I think if the coaches were build for length of service in decades like conversions are typically seeing there would be different fasteners and finishes used.
-
The front lip under the bumper was a no problem section for me. Odd as it was a mixture of fixtures, so my guess is this was setup by Liberty. Even with that, I would expect Liberty to use consistant fixtures for what they did. yet I had two that looked like the ones along the side and three that were different (including the style of bulbs).
The driver side was much cleaner. One screw didnt come out. I will see if I can drill it out and tap new threads. All others came out. Three I needed to use a screw extractor (As Seen on TV) that actually worked!
Need to clean up the inside of the surrounds on the drivers side, then it’s pretty much a quick run down the side soldering everything up and installing the lights into the surrounds. THink I’ll wait till I have shade on that side of the coach though 🙂
-
Dick,
Yes, almost all of the screws holding the light to the side of the coach were s/s, but not all of them. Maybe, some where along the way a couple of them might have been replaced. But, even the steel screws, though a little rusty, came right out.
I think my good luck has to be credited to where my coach lived for most of it’s life, central Florida & Arizona. That has made any service requiring bolt or nut removal a breeze. Even the nuts on the air bags and shocks came off without a hitch. We just did both the exhaust manifolds, and they were easy too.
All we had to do was initially break it loose and it came off by hand. I know how lucky I am. We’ve had to use a hot wrench on many a truck repair. I’m going to stop talking about this, before it bites me.
-
Given the amount of interest on this subject…maybe we could prevail upon Bill to bring some of his products and have a little seminar Sat. I believe he said that he and Jean were comming. Geo.
-
Bill: I read from someone that you were a possible source of closed cell, foam gaskets. Were you able to find them to fit the fixtures? or did you cut them from a large sheet?
-
Bill,
Satuday morning we will be having coffee and donuts in the meeting center and that morning is open for discussion on any topic so if you want to bring along your order book, samples and sales pitch you are welcome. Thanks Geo for the idea.
Log in to reply.