
Prevost Community Forums

Find answers, ask questions, and connect with our
Prevost Community around the world.

  • How to install a toll window lift

    Posted by Ronald on July 2, 2016 at 7:24 pm

    Several weeks ago, a thread was started about replacing the toll and or the co-pilot window lift motors.

    I had posted a comment about not being able to use the toll window any more because I was afraid of not being able to close it anymore.

    Jon had posted about having found the least expensive motor at Rock Auto. I went ahead and ordered 2 motors so as to have a spare for when it may be needed, if the other motor stopsworking.

    Here are the order details:

    Manufacturer: Cardone Select

    Part No. A1 82-144

    Category: Window Motor

    The price with shipping was about $52.00 for 2

    Now, for the funpart. The installation. I am always hesitant when it comes to all things mechanical. I do have 2 left hands. But, ahead I went …

    You start by removing the inside panels.

    Once you have removed the panels and the noise/water barrier, you will be looking at the assembly (above) and you will have to drill out 3 rivets, which Jon referenced in his posts. The rivets will be very obvious.

    You will also have to loosen and remove 2 nuts in order to pull the assembly off of the wall. Again, this will be obvious.

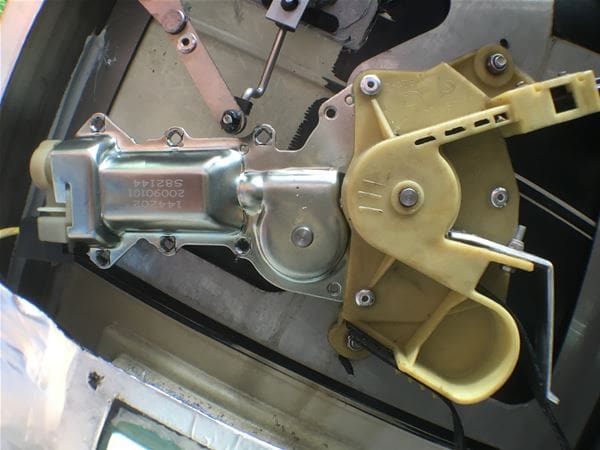
    This is the old motor. It comes out very easily once you have drilled out the rivets and removed the 2 nuts.

    The above photo shows the assembly with the motor removed.

    The photo here below shows the newly installed motor and you can see clearly, where the old rivets were drilled out and new rivets were inserted.
    The result … PERFECT. What a difference a new motor can make!

    My time from start to finish was about 1.5 hours. Anybody who is used to do mechanical work can do this in less time.

    I am glad that I did this. Now, the toll window works like it used to work.

    Amazing what a $25 part can do!

    Cheers,

    Ronald

    Archived replied 10 years ago 8 Members · 10 Replies
  • 10 Replies
  • Archived

    Member
    July 2, 2016 at 9:13 pm

    Ron is demonstrating we do not have to fear our coaches. Except for the magic stuff where someone puts electrons in a sealed box I have come to view repairs on my coach as something I can do. I started off pretty slow with the basics, which were changing oil, filters and greasing the chassis. As I spent time laying on my back on the barn floor under the coach I noticed a lot of stuff that appeared to be service items that did not look like it would be a big deal to service or replace.

    So I started doing some other things like changing brake chambers. Adjusting my brakes. Changing air bags. Changing Norgren and ride height valves. All of those were elective. I did not wait until I had to change them, I gathered as much anecdotal information as possible, along with what my eyes were telling me (hard to ignore the leans) and changed them.

    Then when stuff broke, including fan clutch, CAC, alternator, hub seals, Cruiseairs, etc. I just decided I could replace the bad stuff with new stuff. Some repairs took time because I had to take a bunch of stuff apart to get at what needed to be replaced, but all I was dealing with was nuts and bolts and screws and pieces and parts.

    Some stuff I had to get creative. To change the CAC (charge air cooler) I had to do the lifting myself. That wasn’t going to happen so the alternative was to build a wooden slide so I could slide the radiator and charge air cooler out of position to disassemble them and replace the CAC. The alternator was another problem, but I had a big rolling table that I set to the right height so I did not have to lift 135 pounds of alternator. I just dragged it in and out.

    The point is almost all the work is disassembly and assembly. As long as I keep track of where and how things go together I can do my own work. What Ron has done is shown our buses are not as intimidating as they might appear. If there is anything hard about them it is figuring out what is wrong, but once that is done the rest is pretty easy.

    BTW, the secret is tools. I would rather buy a new tool to help me do the job than struggle or screw things up without the right tool.

    Don’t be afraid of the bus, or the house for that matter. Once you have correctly identified the problem you have done most of the work. I tend to be stubborn and when I am confronted with a problem I try to figure it out myself, even if it takes me days and days. The mental exercise is invaluable. Except when it relates to pushing the little electrons in the box.

  • Peter

    Member
    July 2, 2016 at 10:25 pm

    Well done Ronald and a great post…

  • John

    Member
    July 3, 2016 at 8:21 am

    I did the same repair but bought the motor from Prevost. I wish I had shopped around a little like Ron did. I found getting the heavy foil insulation sheet pulled back was almost the hardest part of the job.

  • Archived

    Member
    July 3, 2016 at 8:32 am

    in my particular case, as can be seen in one of the above photos. I used a utility knife to cutout the crumbled-up part and enlarged the opening to allow me to clearly see what I needed to work on. I reattached the door panels without covering the hole. I think/hope it will not make much of a difference.

  • Chuck

    Member
    July 3, 2016 at 9:04 am

    Great write up! Could it be converted to an Article to make it easy to find in the future?

  • Archived

    Member
    July 3, 2016 at 9:13 pm

    All is well and good until you try this little maintenance exercise on an H3. The access is drastically different.

  • AL

    Member
    September 8, 2016 at 11:56 am

    I’m going to attempt this on my H3.

    Will post pics and narrative when completed.

    I don’t think it’s going to be a walk in the park.

  • Chas

    Member
    September 8, 2016 at 11:08 pm

    Ron, that is an awesome post…one of the best.

    AL

  • Roscoeapproved

    Member
    September 9, 2016 at 9:07 am

    OK Mango, we’re waiting for the DIY instructions for an H…

    For those that don’t know Mango Mike, he’s one of the original good guys…


    Jeff and Lindsay

    91 Marathon XL
  • Archived

    Member
    September 10, 2016 at 6:03 am

    You can do it Mike……….we look forward to the video.

Log in to reply.