
-
Headhunter toilet solenoid valv/timer replacement
I recently replaced my solenoid and timer on my 2001 Liberty with Headhunter toilet.
I was having issues with the timer, as it would just keep the water running, and I would have to shut off the water pump in order to stop the toliet. As threads have noted on here, you can just replace the switch with a momentary switch, but I elected to keep original. Since I was going to get to the switch, I elected to replace the 16 year old rubber diaphram that controlled the water flow and the solenoid valve.
Step #1: removed the shrouds around the toliet. square bit pan head screws are under the little caps, which come off with small screwdriver. This reveals the back of the toliet where the water inlet, and drain pipe are.

left side of toliet where where you see solenoid valve, and the copper pipe fittings to braided nylon hose. There are 2 braided hoses with double hose clamps. One is to the solenoid valve inlet from the main water pump. The second one is from “U” copper pipe to braided hose that goes to inlet of toliet water supply.

right side of toliet showing the drain pipe from toliet connecting to the holding tank with black rubber pipe and hose clamps.
Step 2:
In order to remove the toliet, you have to loosen the drain pipe connection, and the braided nylon line connected to the copper pipe on the left. The braided hose is held with 2 hose clamps, and very tight to get off. I heated the connection with powerful hairdyrer to heat up the braided hose. Have a lot of towels on hand, as there is water in the line. You should have pump off, and flush toliet to get pressure off system. Would even open faucet in bath to take more pressure off. Remove water from bowl by using sponge into bucket trick, or else you’ll have water all over the floor.
4 lags screws hold the toliet to the floor, remove cover caps, and unscrew the 4 lag screws, and the toliet will come off floor and move forward.

Picture shows the hose clamps off the connection to holding tank. Rag stuffed into line to decrease sewer smell. Toliet is forward off the wall.

Picture show the solenoid with fitting going to water inlet line, braided hose. The “U” copper pipe coming from the solenoid and ending with nylon taper fitting goes to the toliet inlet water supply. Both of these connections held in with 2 hose clamps, Again the back braided inlet hose to the solenoid inlet was loosen by applying hot air to heat up the hose.
Disconnect the wires for the solenoid and timer switch. only 4 spade connections, and on my coach the connections were male on one wire, and female on neighbor wire in order not to cross wires.
Step 3:
In order to get the solenoid valve off the copper “U” I had to unscrew the top of the solenoid cap that holds in the rubber gasket. This allowed my to put the pipe in vise, and get off the old solenoid and attach the new. I had to unscrew the top off the new solenoid valve in order to reattach it to the copper.

Picture showing top removed from Solenoid valve in order for the valve body to clear the fittings.
My old solenoid valve did not have an inlet screen, but the new one does.

Picture showing old inlet to valve on right, and new screen inlet to left.
Step 4:
Once you have the new solenoid back together, you have to reverse the dissassemble process. Start by attaching the solenoid inlet back to the braided hose. Use the heat gun or dryer to get the hose warm. Then attach the braided hose to the toliet inlet. WARNING: As Jon has noted on his project, do not forge to tighten the clamp that holds all the PVC pipes on the back of this toliet to the bowl outlet, It gets very loose. The clamp is under the toliet, and holds the PVC pipes to the outlet on the bottom of the toliet. failure to do so with cause a flood in your bathroom. Trust me on this. All the wiggling that you will do to get the pipes back together will loosen that connection.
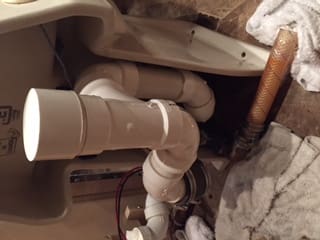
Picture showing the back of the headhunter toliet with the PVC pipes. far right is the braided line that attaches to the copper “U” pipe and goes to the water inlet of the toliet. the far left is the connection to the holding tank. PVC in the middle is the vent pipe. The clamp described above is way under and in the “dark” area.
Step 5:
I attached the new timer to the toliet outlet pipe with wire ties. There is a blue pot knob on the timer that allows you to determine the length of your flush. Reconnect the drain pipe to the holding tank pipe. Before you screw it back on to the floor, cycle the toliet a few times to check for leaks, and adjust your timer to your flush time preference. Once done, screw 4 screws back onto floor, and put shrouds back on.
Total project time was about 3 hours for me. Most of this was getting the solenoid valve off and back onto the copper “u” pipe.
Parts for project:
Superbowl neoclassic timer module ,4 wire, Part # SBTD-MOD $230.19
Solenoid Valve 24volt DC with inlet cone shaped monel stgrainer with 1″ nipple. Part # SV-2400 $191.43
Parts obtained from Headhunter in Ft. Lauderdale, Fl
William
PS I hope Tom can rotate some of these pictures. I could not figure out how to rotate them.

Log in to reply.