
-
Another one bites the dust!
Posted by Dana on July 21, 2017 at 9:47 pmHad what seemed to be a slight leak at my discharge of my holding tank, so I decided to take it apart and check it out hoping it was just a leak around the rubber sleeve.
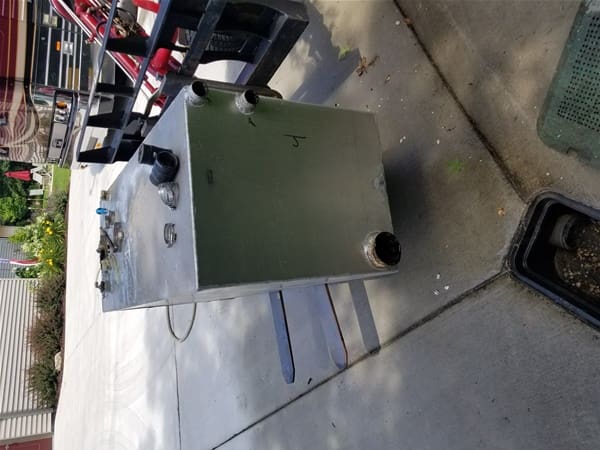
Long story short, Liberty Owners and others have discussed this many times, now I need to replace my tank. I did my usual checking among converters and maintenance facilities and decided to check locally(Central Wisconsin). I found a place in Marshfield WI called Stainless and Repair that builds large tanks for milk trucks and so forth and gave them a call. Talked my way to parts and told them my plight. I took my old aluminum tank to them and had them reproduce it out of stainless. Amazed as I was to get it done, they built it in one day! As expensive as it was, $980.00, it was cheaper than buying a replacement and having it shipped or driving 20 hours one way to get it. The people were very nice and very accomodating. As Jon had said in a post a year ago its a little heavier, but it’ll never rot.
Now the task of putting the new one back in!
I’ll get more pics as I’m working it back in. A little grease, some cussing and a lot of sweat is in my future!


 Archived replied 9 years ago 8 Members · 13 Replies
 -
13 Replies
-

Hi Dana
How easy was it to pull the tank out? can one person alone do the R&R on the tank? Please post more pics.
We moved to Las Vegas last October if you near our area please call.
-
From experience I can tell you that tank removal on an XL or XLII is a one man job and just requires the willingness to take a lot of stuff apart to make access to fittings easier and to provide the needed clearance for removal.
I have never done a tank removal on an H3 but I am guessing there is no reason it would be much different.
Here is some free advice to those of you that have an aluminum tank and will (not if) replace it. Use stainless steel. To keep the weights of the tanks close use 16 gauge 300 series (302 or 304) stainless steel and weld all joints inside and outside and do not grind or polish them. Make sure the welder installs the top last because the top does not have to be double welded.
Do not install any tank that has not been leak tested.
The tank made of 16 gauge stainless steel can be pushed and slid around easily, but lifting it up to get it started in the bay has to be done carefully so you do not hurt yourself lifting or so you do not damage the tank or coach. I have used a small motorcycle jack and I have also used my floor creeper built up with some wood blocks to get the tank to the right height. Both allowed me to roll it around on the floor.
-
Jon
Thanks, I hope I never have to do that work, but if I have to I will so far so good. It is good to know the choices and do agree that the best way to go if a tank replacemnet is required it should be S.S. and not AL. and again test before installing the tank in place another great way of not having to pull the tank out to fix leaks.
-
Here is my spin on this issue………….
If you have an aluminum tank now, don’t wait to get it out. If you think you are saving money or delaying an expense it could bite you in the butt.
When I pulled my tank on my coach that was in service about 5 or 6 years before I bought it I found in that period of time the tank had already corroded so much at least one of the fittings had rotted so much it had to be replaced. My tank was about 7 or 8 years old when I pulled it and the bottom main outlet flange was all but gone. I could not believe how lucky I was pulling the tank to replace it even though there was no clue its failure was imminent.
I have seen a decent collection of tanks that were pulled for replacement and all showed almost total fitting failures and one had its bottom corroded so badly it was riddled with pin holes. I have no clue how long these had been leaking, but I know from a leak on a previous coach in the fresh water tank that leaks go undetected for a long time, and by the time you realize you have a leak, the wood bay floor has partially rotted away. At that point you get to pull everything out of the bay so you can do a total floor replacement.
-
As Jon Had mentioned it is a one man job as there is no room for 2. Just a lot of tedious work before tank removal and installing the new one. I used a tractor with forks and a come along to get it out so it wouldn’t drop to the ground, especially since I wasn’t sure how heavy it would be. After it was out, I carried it to my trailer to haul it to Stainless & Repair. I didnt want any leftover sludge emptying into the bed of my truck. I made sure to mark all hose ends and take pics of wiring so everything gets back where it belongs(The best thing a smart phone was made for). The hardest part would be getting to the fittings on the back side near the Hot water heater and starboard dump. It requires removal of your filters to gain a little head room for your arms to reach. I am going to look into replacing my Hot Water heater too, just because its 16 yrs old and theres room to work. We’ll see what the boss says. I may have already reached my repair limit for the year. And if it isn’t broke don’t fix it!
Today I’ll start getting things ready to go back together. Cleaning and making sure I have everything I need to complete it.
As Jon just mentioned, My Macerator fitting on the tank was at the completely failing stage, and my 4″ dump was not far behind.
-
Heres a pic of the tank end that failed and a side by side comparison of the old and new tanks. Also the empty hole where the tank sits. Notice that I put white vinyl on the sides to protect them from scratching.


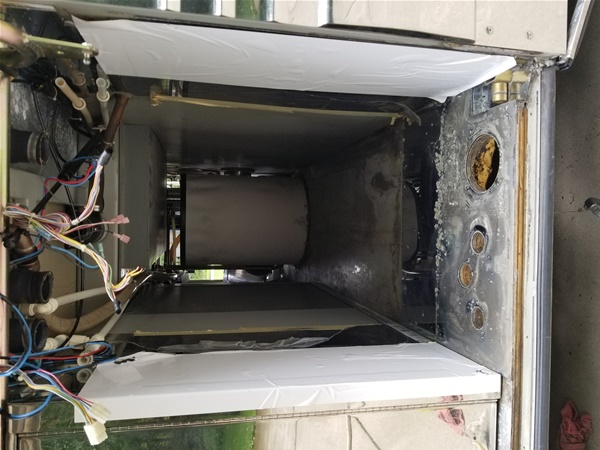
.

-
Dana,
You are a brave man for such a project. Good job !Safe travels,
Rocky -
Rocky,
It’s more time consuming than hard! Just take plenty of photos so everythung goes back together right. Have to redo some of the PVC piping to line back up to the existing. I put the tank in and pulled it out 4 times just to get everything lined up right on the starboard side. The rest is mainly clean up and assembly from here on out. The folloing pics show the tank in with the original stainless cover back on.
By the Way, Rocky, where do you splice fiber? We work mostly around Upper Midwest. Mostly new Contract work(FTTH), but we also do Splicing and Maintenance for a few independant Tel Co’s.
.


-
Dana,
The last 15 years We have spliced in Ky and Tn. Mostly telephone new build and maintenance , Emergengy restorations , road moves and a lot of Stimulus work there for a while. Approx 1500 new remotes and about 2000 miles of cable. They also wore us out on cell towers for 2-3 years. With a few FTTH jobs thrown in. Have done some power company backbone jobs and some of the dreaded OPGW. Has since slowed down in this area to very small jobs and a lot of MOP’s and emergency call outs.
Not opposed to travel once in a while. Should You need a little help up that way. Our youngest Daughter graduated college last year and I am trying to get Our coach ready to roll. Have 8 bucket and 4 splicing trailers. And one underground truck. Currently only use 2 rigs. I need to put them back to work or sell some of them. Shoot Me an email sometime.Safe travels,
Rocky1999 XLV X-6872, liberty #440 -
Rocky,
We’ll have to get together sometime!
Here’s a final pic of the install as we were packing up to leave for a few days
-
Dana,
WOW , What an outstanding job You have done there My friend. I can tell by this that You undoubtedly have meticulous looking splice trays and closures ! You will have Jon out polishing His pipes again.You can click on My usser name and shoot Me an email sometime. I have a 50 Amp plug for You here below Lake Cumberland , On the Cumberland River. Should You ever need a layover between the cheesehead state and the blue hair state.
Bsafe,
Rocky -
Thanks Rocky,
We have room and a spare 50 amp at home for you also.
We pride ourselves on the look an ease of re entry of our closures and splice trays.
Some Telco splicers want the trays labeled in such a way that they don’t have to think. You’d be surprised at how many splicers nowadays that can’t figure out count on a cable tag and tray labels. -
Oh Man ,
I feel Your pain. We deal with the same thing on a daily basis. We pretty much have to Re-engineer the majority of the work we do. A lot of the schematics We get. Are just a basic guideline at best. They ask Us to
” Just make it work and let Us know what You had to do ” One of Our splicers found this shirt somewhere and sent us a picture. I told him that he could could not wear it on the job. Even though it is true.
You have a beautiful coach , I love the colors. Be safe out there.
Rocky
Log in to reply.