
Prevost Community Forums

Find answers, ask questions, and connect with our
Prevost Community around the world.

  • Annual Inspection Blues

    Posted by Archived on February 12, 2017 at 8:49 am

    While you retired guys are off sunning yourselves in Florida
    during the winter months, I take advantage of the mild South Carolina winters
    to get my annual maintenance done. Up on the ramps and – yes Jon properly
    blocked with jack stands.

    Oil and filter change done

    Lube chassis done

    Adjust slack adjusters done

    Blew air tanks down in sequence and verified the check
    valves (replaced last year) hold.

    Then on to the list of preventative stuff

    Change QR-1 steer axle and drive axle parking brake (Why
    does Prevost CatBase for my 93 chassis show an R-14 on the parking brake? Why
    does it think I have parking brakes on the Tag? Sometimes !!!!!)

    Change R12 on drive axle service brakes and curb side tag
    axle interlock (Jeff changes the street side 2 years ago due to a valve body
    leak).

    I suspect those were original, and as best I can tell
    completes the underside rubber parts refurbishment stated 4 years ago when I
    bought the coach. All air bags, brake chambers, flexible brake lines, primary
    and secondary air tank check valves, relay and quick release valves, ride
    height valves and Norgren valves have been changed.

    But alas annual inspections are not without surprises: First
    the curb side drive axle hub seal is leaking. Noticed it when I backed the
    coach from the barn to move the ramps into place. That is the 3rdhub seal leak in 3 years. The first two were both on the street side. (The
    first replacement seal had the rubber rolled out of the metal ring.) Second the ½ shaft flange on street side is
    leaking from last year’s replacement. Both of those will get addressed in a few
    weeks at a truck place.

    Lastly, I found this: (Pic sideways)

    That’s
    a
    pilot air line to the curb side 3 port
    -2 way valve between the drive and the tag.

    Clearly kinked and no air was reaching the valve so the spool did not
    move and leads to this: (pic upside down).
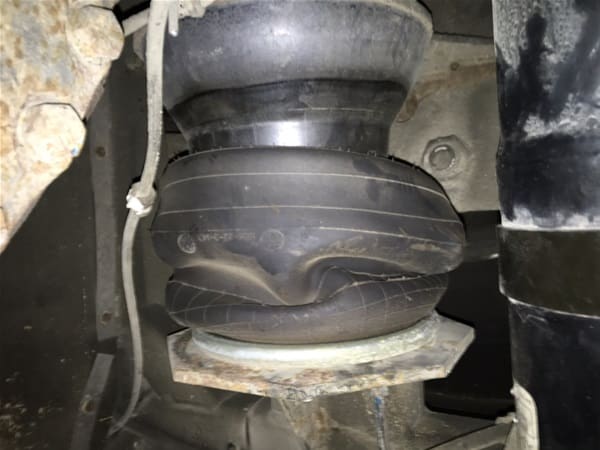
    A deflated tag airbag and of course no brakes on the curb
    side tag. Repaired by cutting the line past the kink and reconnecting with new
    ferrule and compression nut. No twisting action on the line this time.

    The interesting thing is the coach always leaned on the curb
    side rear, even after replacing the norgren valves and airbags and plugging the
    exhaust ports on the 3 way valves between the drive and tag. I could never find
    the leak. Jeff and his magic ears could not find the leak. But last spring
    after the annual maintenance, I backed the coach out of the barn for a wash and
    returned it to the barn. No more leans. Rock steady for up to 3 months thru
    summer, fall and early winter. It fact it never sat down on the jack stands.
    The good news is if the leans return because of my repair I know it is between
    the curb side norgren and the tag bag. But I may never understand why the leans
    stopped after a 100 ft trip out and back in the barn. Stayed level overnight –
    good start.

    So if you do get under the coach and do some of your own work,
    look around under there. You may never know what you see. And my annual
    admonishment to myself, I should have built a pit!

    Anything else before, I roll it off the ramps?

    Archived replied 9 years, 7 months ago 3 Members · 6 Replies
  • 6 Replies
  • Archived

    Member
    February 12, 2017 at 2:46 pm

    Joe, there are so many things to look at and check I find myself spending about 5 hours total under the bus when the work (oil change, lube, filters, check fluid levels, check air tanks, etc) takes about 2 hours.

    I rarely find something, but when I catch something early like a bad sway bar bushing it makes it all worth while.

  • Tim

    Member
    February 12, 2017 at 4:51 pm


    I was likely under there at least 8 hr. Over a couple of days. Ran out of grease trip to NAPA. Pull one of the R-12 valves put it in a vice to remove the fittings and it slipped, crushing the threads on a fitting. Multiple trips to NAPA for a replacement fitting. Even with the part in hand and me telling them for nylon air brake lines, they ordered the wrong type and the wrong size. I finally looked up the part number in the gates catalog and got the right one. Too many compression fitting types and the nylon tube type is not listed in every gates catalog.

    still learning what to look for and hope I “see” what I’m looking at. I could have easily missed that kinked line.

  • Dan

    Member
    February 13, 2017 at 3:07 pm

    Joe , I would check your rear end gear oil for bits of metal with a magnet is best because usually the reason for seal failure is metal fragments from rear gear failure as they work there way out to axle seals and cause leaks from tearing the fabric before you notice a problem as it is very unusual for 3 seals to leak that quickly.

  • Archived

    Member
    February 13, 2017 at 3:27 pm

    I agree, but I also have watched professionals beat the hub seals in place such that the inner race would not rotate within the outer race or at least it would bind a little due to the deformation of the sheet metal of the hub seal.

    Before the hub is reinstalled place your fingers inside the hub, expand your fingers and see how freely the inner portion of the seal rotates. It will drag a little, but should turn freely without any tight spots.

    Joe if you have changed the differential grease you would have noticed “whiskers” of steel. Also the plug you remove to check the level is magnetic and if there are no whiskers there you should be OK. One last thing to check is the vent that I think is passenger side on the leg going to the wheels at the top. Make sure the vent is OK because if it is not vented that can cause hub seal leaks. (I’m surprised Jim didn’t beat me in saying this He is very good at pointing that issue out.)

  • Archived

    Member
    February 13, 2017 at 6:31 pm

    I checked the differential and no steel on the magnet. I had the differential changed at 100K miles recommended frequency. That was just after I bought it. I did not get to look at the drained fluid.

    I think the first street side seal was either rolled out of the metal ring during install or was just infant mortality. The workman ship was good. Jeff did it. No complaining here. The bad seal was evident when it was removed.

    I watched the second install from stem to stern, ’cause Jeff didn’t do it. It was good. I did not see any metal in any fluid that came out during the install. The damn 1/2 shaft flange gasket is just weeping. A couple of table spoon collect in the hub cap /wheel after a month of sitting.

    The current curb side hub leak is a much smaller leak than either of the street side leaks were and it seems to have slowed or stopped after I put it on the ramps. but my guess is that I rotated the bad spot to the top when I stopped on the ramp. It has not been leaking long or I would have noticed during some use in the late fall. I go back to the parking spot after pulling out to look for any gross fluid leaks.

    I will give the breather another look. I think I just pulled it up and made sure the cap rotated freely. If the cap rotates it should be good?

    Or do I need to inspect in a different way?

    At 23 years old, I can say that finding all of those in the barn vs on the road, and getting one more piece of rubber changed out is not a bad feeling.

  • Archived

    Member
    February 13, 2017 at 9:13 pm

    I think the hub seal issues could be coincidence.

    They are an unexplained failure when they do begin to leak because I have had three coaches go 250,000 miles with 4 of the six original seals and I had to replace 4 out of the twelve total, and none of the replacements ever leaked. On my current coach two seals were replaced prior to my taking delivery, and one of those failed, was replaced and 60,000 miles later no leak.

    Cleanliness and care to not damage a seal during install are the two things that determine if a seal will last or if it will be a future issue.

Log in to reply.