
-

I’ve thrown in the towel. Coach failed to raise and had to manualy raise to drive. Have appoinment 7am in morning Prevost Ft Worth, 375 miles north. Bus is 1991 XL and will replace all bags valves and whatever else. Bought bus with 51,000 miles and have put 13,000 miles on it in the last year and a half. No problems until a couple weeks ago. Had sit for about 7 or 8 years in busbarn when i purchased. Had mechanic check coils and valves and all okay but something else. Gonna replace all air components if needed. Will go by Wells Fargo or Chase with mask and redraw money to pay out. Might need to rob several.
-
For my 2 cents (and I have said this before), I would like to add or modify to that tool list if there are just 2 and especially if only one person is working on this type of project. A breaker bar or pipe are obviously a help – if you have it and room to move it when working on a lug nut or Budd wheel stud. Even if you have access to a sufficient air supply and a pneumatic impact wrench, it may easily be insufficient to loosen a recalcitrant lug nut. An X-12 torque multiplier wrench is an essential tool, in my opinion, expensive as it is.
A 3/4″ drive flex head socket wrench handle flexed rather than break loose a nut that was close to the ground when I stood on a cheater pipe. If I rotated the socket up a flat or two, and I had to raise one foot to get on the cheater, and had the foot slipped, the potential for losing a testicle or two rises exponentially. I have seen a number of times when having new tires put on (this was the Bluebird FC), the truck tire mech have to abandon the air wrench, amid the use of some terrible language, and go get the X12. With that, a child would have no difficulty.
As for drum brakes, I have found that a long handle sledge hammer with a head weight of at at least 12# (I think) is invaluable for loosening the drum from the drive or spindle shaft flange (rust). If you do not have one, I would be curious as to how it gets done in a timely fashion. Thanks for listening.
-
Glen,
If your coach will not come to the drive height in all positions the most probable cause is the coil for the drive height solenoid valve in the suspension system has failed. On very early coaches the suspension may or may not have been controlled by a stack of solenoid valves, but there is going to be a single valve that routes air pressure through the ride height valves. On most coaches it is the 3rd valve up from the bottom.
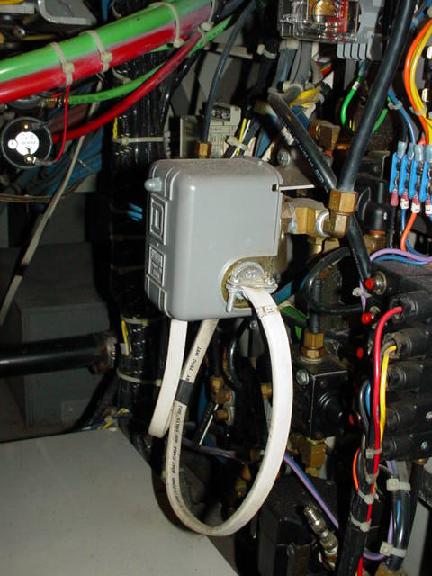
In the photo above the valve coil to replace would be the center (third up) coil in the stack shown at the extreme bottom right in the photo. The coils have the multi colored wires to them. You can swap coils because when driving only one is used. The others are for leveling.
-
Jon,
Thanks for the dimensions. I was thinking about building a set of ramps to get some working room under the bus (since I don’t plan on building a pit in the barn), I can adjust the height of the stands for the normal ride height when on the ramps. Then let the chasis down on the stands.
-
Thanks Jon for the pic. I took it in to Fort Worth at Prevost shop. They called this morning and said they fixed the problem with auto height when you start engine but tech checked this morning and bus was leaning one side and would bring back in and see if they could find leak. While in there had um change fluids. Thanks again.
glen
-
Glen,
As our coaches age they lean. At that point an owner needs to make a decision regarding piecemeal repairs or “refreshing” the underside with new air bags and valves.
There was a time about 15 years or so ago when an owner who brought a bus in with the leans that the techs would spend hours and sometime days squirting soapy water to find leaks. YOU CANNOT FIND A LARGE PERCENTAGE OF LEAKS ON AIR BAGS USING SOAPY WATER BECAUSE A LARGE PERCENTAGE OF THE LEAKS ON AGING AIR BAGS ARE BENEATH THE “PISTON” AND THEREFORE CANNOT BE SEEN.
I “shouted” the above because at $100 plus per hour squirting soapy water you can pay for repairs without even attempting to find the leak.
My philosophy is when I know my valves and air bags are 10 years old, I throw them away and replace them. I don’t care if they are good or bad. They will be bad in a short period of time anyway and then I have to waste time chasing leaks and spend more labor doing that than just replacing the affected parts.
Shop around for repair prices. The differences between competent shops can be staggering.
-
Hi John, Sounds like you’ve gone through exactly what I am about to go through. I was wondering what that module was. Now I know it is a R 14 module. I discovered the same thing with my coach today. Thanks for explaining your troubles! This will shed light on my long learning curve of being a motorcoach owner!
-
I have several large trucks that require maintance ,the rear axel or hub seal seldom needs replacing unless you have or had a brake problum that heated up the seal causing it to harden , harden by old age, or lack of use ,, some good advice is to only use a seal that is from the manufactor or the brand National Seal Almost every time we have used any other brand inc all the big names they just don’t hold up for any amount of time. And aways coat them good with white lube as the spin inside them self so they dont have to turn on the hub as the lube may be lower than hub level.
-
I am going to ask Jon to chime in on this one. We used an SKF seal (OEM). We thoroughly cleaned the axle and all associated parts. Because the seal is mostly steel, we froze the seal and sprayed the rubber with silicone prior to axle installation. Because that seal is probably 80% steel, the freezing allowed the installation with little or no effort, couple of raps with a plastic hammer and it was home. We do this with bearing races all of the time and it certainly did help us with the seal replacement. We cleaned and repacked both the wheel bearings with lithium grease. Additionally we replaced the gear oil that was lost during the procedure with a 1/2 inch plastic hose and fed down the axle shaft as I was not comfortable crawling under the beast an filling at the pumpkin.
My best guess is that the seal we replaced was closing on 14 years and 100k, so I do not think it too surprising that it failed. As mentioned earlier, we found the leak during other procedures, apparently it was fresh as we had no contaminationof the brake linings.
-
I don’t think using grease on the bearing is a good idea. It could contaminate the gear lube. The whole idea of the seal is to let the lube from the differential flow to the bearing and also lube that. I know that we NEVER used anything but 80-90 gear lube for wheel end bearings/differentials on all of our trucks, which has the same type of rear differential as our coaches do. There is also a specific tool for installing seals. If you don’t get them aligned properly, they can also fail quickly. You may have gotten lucky and have it in good enough, but unless it is correct, it could fail real soon. I have never heard of anyone “freezing” a seal prior to installation FWIW.
Also, how do you know that the differential lube level is correct without checking at the plug? That is the only way to do it. If you don’t have a way to get under safely to check it, by all means, go somewhere close that can and have it checked, and if I were you and don’t know how long it has been in there, get it changed as well.
-
I knew I was going to get heat for that as soon as I posted it! I am well aware that the wheel bearings are lubricated with multi-vis geat oil however, we pulled the bearings, soaked them in solvent, blew them dry. Lithium grease is one of the few lubricants that mix with everything, including 85W-100 and it may well have been like putting on suspenders after notching in ones belt, however it may take a few miles for the gear lube from the pumpkin to make it to the bearings, especially since we removed, cleaned and inspected same…that’s enough in my book for some unpleasant results.
Regarding freezing, guess the airplane is coming out. We usually freeze seals and bearing races with airplanes….the wheels are magnesium usually and do not tolerate the typical heavy equipment handling. We used a micrometer on the seal before and after it’s visit to the deep freeze and we go the seal down between 4 and 5 thousanths which was pleanty to allow easy installation. Regarding improper installation, don’t see how that is possible unless one drives the seal home with a socket or something that would cause damage to the seal itself.
As to how we knew how much oil to add, the coach had just come out of service and we had a drain container under the axle the entire time. We replaced that amount with fresh plus a couple of tablespoons that had dripped on the inner wheel. We heated the oil so it would flow better and gave it a compressed air chaser. A titch more than a pint, which in the grand scheme of things probably means the oil level was fine.
-
I think we all agree on the basics. First, a seal must be replaced in manner that will not compromise the way it works. Anyone installing a seal has to end up with the seal properly seated and has to insure that the inner portion of the seal will rotate within the outer fixed portion. The critical part of seal installation is to insert it into the hub straight so it does not wedge itself sideways.
I agree with Mark’s comments but there are more than one way of replacing seals. John has used an approach I am going to try if I have to replace a seal because by shrinking the seal installation is going to be much easier than the press fit. I would not use a plastic mallet or hammer, but probably would use a flat plate or piece of wood on top of the seal and tap on that instead of the seal. In fact I have used a short piece of 2 X 6 to install every seal I have replaced and tapped the seal in by a series of taps around the perimeter of the seal to insure it goes in straight. I have never had the two portions of the seal bind and I have never had to replace a seal twice. I would like to try a tool designed specifically for seal replacement.
As to lubing the bearings….Critical. How the bearings are lubed is less important than making sure they are lubed. I know of two Prevost owners who had hub seals replaced on the drive axles who managed to get about 4 miles before the bearings seized and the end of the differential was twisted off. Both coaches were trailered with more damage occurring. The bearings and race have to be cleaned completely to inspect them. If there is any problem they need to be replaced before the hub is re-installed. I think John’s choice of bearing lube insured his bearings would not be run dry and it sounds as though there is no incompatibility with gear lube. I have seen mechanics use plain grease to pack the bearings and except for damage due to unlubed bearings in my 22 years of owning a Prevost I have not heard of anyone replacing hub bearings. If the use of grease to pre-lube bearings is a concern the easiest way to insure the hub is full is to either tip the differential so the hub seal that was just replaced is on the low side. Allow gear lube to flow into the newly replaced hub.
Some Prevost coaches have a threaded hole and a plug in the end of the axle face. An alternative to tipping the differential is to add 1 quart or so of gear lube to fill the hub. Any excess will run back into the differential. What is important is to never ever allow a wheel bearing to run dry.
Checking the differential gear lube level is best done at the plug on the differential.
-
It all comes down to the same thing: we want the bearings to be lubed enough, the seal in correctly and undamaged, enough oil in the differential, and no issues going down the road! I guess as long as none of the different ways of installation hurt this, then it really doesn’t matter as far as I can see.
-
I have had buses for thirty five years and had to work on them most of that time along with large trucks , the point I was trying to make was if I didn’t use OEM was the word I was looking for or National seals I would almost aways have a leak shortly after. When you install the mulit piece seals the ones that spin inside them self it is a must that you don’t hit them with a hammer I have a seal installer for most of the seals we install ,but the 2by larger than the seal should be ok mine looks like a socket just a bit smaller than the seal has with a long threaded rod tha goes through the hub with a piece that fit the race on the outside put on washer, nut and pull the well lubed seal in with a 3/4 in wrench, I use white lube , We also pack our bearings with that stickey blue grease made for axel bearings. Also use the blue greese on the front oil bath bearings . .Just because it”s big don’t make it hard just heavy.Thies seals need to have a coat of permetex smered all around them on the hub side so i would not think freezing is a good idea. Do aircraft seals spin inside them self,we hammer in seals that spin on hub.
-
I am not a fleet owner or a professional mechanic, so my number of seals replaced on my coaches and the coaches of others is limited. I have done about 6 on my own coaches and a lesser amount on friend’s coaches. On one coach the place I got the seal lent the installation tool and while it worked OK I still had to be careful to pull the seal into the hub evenly. The key is to just insure you never beat directly on the seal when installing it. I have never used permatex or any sealant. I have installed all of them dry and never had a leak. I guess as Mark says as long as we use care there are different ways of successfully installing a seal.
My two previous coaches went about 250,000 miles with at least three of their original seals. Why half of the seals failed and the other half never leaked is a mystery. What is important is to routinely check the seals for leaks, something I do every 5000 miles when I am under the coach lubing it. If the seals do leak, apart from a greasy mess the big concern is how grease finds its way onto brake linings or pads, drums or rotors and really screws up the brakes. If left too long and the grease level gets too low a seized bearing will ensue so part of any pre-trip inspection should involve taking a quick look to verify the seals are OK.
I am not qualified to judge the quality of seals except to say the seals I have used from Prevost or the local seal supply house have been Chicago Rawhide (Scotch) or SKF and both have been trouble free. BTW, seals do not “flat spot” from having the bus parked for any length of time. The way they are positioned in the hub, which is concentric and unmoveable keeps the seal prefectly aligned at all times. I think if they fail as Dave points out it can be heat or just the aging of the seal materials.
Log in to reply.