Prevost Community Forums

Find answers, ask questions, and connect with our
Prevost Community around the world.

  • Air Leak or Pandora’s Box ??

    Posted by John on December 29, 2012 at 8:13 am

    I
    went out to start the bus and noticed that the air tanks were sans
    pressure. The coach was sitting low with no signs of the “Leans”.
    I started the engine and allowed the pressure to build, the bus
    would not come up, air pressure would not go above 70 psi, a walk
    around revealed a very loud hiss from the LH drive axle region. At
    this point I assumed it was an airbag failure so I ordered the airbag
    set for the drive and tag from Prevost, even though the bags were
    only about 5 years old.

    We
    had no options, the bus could not be towed, could not put it on a
    lo-boy without chancing damage, there were no mobile mechanics
    available so I grabbed an aircraft mechanic to help out with the job,
    actually he did the lions share. I communicated with Jon Wehernberg
    and the next morning we jacked the bus. I had airbags in hand but
    after starting the engine without wheels on the left rear it became
    evident that it was a leak in the brake system. Turned out to be an
    R-14 module or valve that controls the parking brake, exhausting air
    at a hefty rate. We removed and replaced that valve and as long as
    we were there we changed the air bags and the canister on the air
    dryer……elapsed time around 4 hours.

    Everything
    held well for 18 hours then…bingo the Leans! Bad leans to the
    left! This time when we jacked up the bus to search for the perp we
    found that the slip in fitting from the rear drive air bag to the air
    tank (accumulator) had failed. We replaced that fitting with a DOT
    compression fit and that problem was resolved, meanwhile we noticed
    that the drive axle hub had started to leak oil. Day two, 4 hours
    elapsed time.

    After
    getting the seal and yet another chain of e mail to Jon, and a couple
    of calls, we once again jacked the bus, pulled the drive wheels,
    pulled the brake drum on the drive (98XL Chassis, 99 CC), then the
    axle, the hub and finally got to the seal. Replaced the seal, put
    everything back together and were back in business, elapsed time 4
    hours.

    Jon
    is about to publish an article on the rear oil seal replacement ( I
    have it and it is very helpful);I have also forwarded some additional
    information and pictures to him that may well appear. We picked up a
    few tips from others but basically, although both of us are
    experienced aircraft mechanics, this was all new. I have no idea
    what it would have required as far as time for a shop to do the job
    and I would have gladly done that, just that we couldn’t move the bus
    and after getting into the job discovered it was easy albeit
    big….the parts that is. The brake drum had to weigh two hundred
    pounds, a big job to pull off, even bigger to replace; two men and a
    floor jack got it done. I just thank the stars that this happened
    while the coach was parked along side my house rather than in some
    distant locale.

    John

    AL replied 13 years, 8 months ago 20 Members · 67 Replies
  • 67 Replies
  • Larry & Diane

    Member
    December 29, 2012 at 11:30 am

    John and I communicated a lot during his repairs. I think the one thing that I hope John will agree on is that what he did involved grunt work and some basic skills which he clearly possesses but there is not a lot of magic in dealing with leaky brake parts, air bag replacement, hub seal replacement but there are some safety issues to consider and a few tricks to help with the repairs.

    Good job John.

  • Archived

    Member
    December 29, 2012 at 12:27 pm

    I would call that a major job. Can you post the pictures here?

    I admire you guys that have the knowledge and gumption to tackle jobs like that. Congratulations! I am glad it went well.

    DKO

  • Rick & Denise

    Member
    December 29, 2012 at 3:46 pm

    A complete article on hub seal replacement will be up in the articles section in a week or so. I don’t have the file in this computer, and I want to edit the article to incorporate John’s advice and photos also. John has provided some good information and suggestions that have to be included.

  • Bill

    Member
    December 29, 2012 at 4:05 pm

    Jon has written an excellent article to which he is making some final adjustments. I forwarded some pictures to Jon and I am certain that they will appear in the article, watch for it! For the time I will pass on the following with regard to the tools that are required to complete these tasks.

    1. A good set of line wrenches, up to 3/4 inch. (these are just hefty box end wrenches with a 1/2″ notch removed, we attempted to make a big one by grinding out the notch in an Indian (made) 3/4 inch wrench…the heat from the grinding caused the wrench to lose its temper, failure)

    2. A 4″ bearing socket. This is 3/4 inch drive socket made out of thin wall construction they run about 500 and are a far better alternative than trying to “drift” off the large nut on the axle.

    3. Jacks. We used a 30 ton, a 20 ton, two 15 ton and a 12.5 ton ( just in case) bottle jacks. I would rather have used a stand of sorts but tiime constraints prohibited that action so our pleuthura of jacks were a reasonable substitute, cannot stress enough that you do not want this thing falling on you! We were working on gravel (compacted abc) so we used run out automotive brake rotors for a large footprint for the jacks to keep the bus from converting the jacks into pile drivers.

    4. A respectable set of 1/2 inch drive socket wrenches, 1/2 to 3/4 adapter, soapy water spray bottle, floor jack, breaker bar, misc screw drivers, wheel chocks, your Prevost MM Manual (maintenance), bandaids and lots of rags and 3-5 cold beers (between the two of us an an occasional onlooker) to be consumed each day only when we finished!

    We used an Ingersoll Rand 3/4 inch impact wrench to break the lug nuts on the wheels and to r and r most nuts and bolts. I would call this a “nice to have” rather than an imperative. We had a 5 hp compressor although it only was a 30 gallon tank so we were somewhat challenged but patience will out!

    As mentioned prior, this is not difficult. It may help to be a 20 year old body builder with the ability to press, oh say 500 lbs, but that is really not necessary. There are several precautions that Jon will mention but all in all, as I reflect, it was kind of fun. Anybody with basic mechanical skills, some patience and a few specialized tools can make this happen. I really don’t know if this saves much money but it does assure you, if proper procedures are followed, that the job will be done correctly. I am the second owner of this coach and I purchased it 10 years ago, all maintenance has been either done by Prevost or independent shops with yours truly in a supervisory position (lets call that a sidewalk supervisor)….anyway we found signs of shoddy maintenance, cross threaded components, rounded off nuts from using out sized wrenches or worse. We eliminated each of those items with replacement, mainly in air system parts. Watch for Jon’s article.

  • Archived

    Member
    December 30, 2012 at 9:00 pm

    I need to do an airbag – to stop my leans. How about an article on that Jon, or just add it the seal article. the set up steps have to be the same.

  • Christopher

    Member
    December 30, 2012 at 11:59 pm

    Mango Mike has a very good article already, in fact the rear bag change is, I do believe, penned by Jon. http://www.prevoman.com/. The bags are now about 1800 ea. from Prevost with your VIN; probably preaching to the choir but don’t forget the LH wheels have “wrong way threads”, rightie loosie, lefty tightie! Also from my experience have a good look with soapy water spray at all fittings especially the slip in quick connects which are easily replaced by DOT compression fittings available at all large truck part stores.

  • Archived

    Member
    December 31, 2012 at 6:37 am

    When our coaches start to lean often the first thought is the air bags are the problem.

    First let me make it clear that they could be the problem, especially if they are old. I replace mine when they are 10 years old along with the Norgren valves just because from that point on they can begin to leak or fail due to the aging of rubber. But in doing that I am throwing away a lot of good parts. I just don’t feel like chasing leaks one at a time and I do not want to experience an air bag failure when on the road. The cost of that can be very high.

    I do know from experience however if the coach is starting to show signs of leaning I will not look first at the air bags. If the air fittings are compression fittings and they have been tight I focus on the Norgren valves first. If the valves check out I carefully check the fittings, and then shift to the air bags. You cannot detect all leaks in the air bags with them in place on the coach. It is not possible to detect soapy bubbles around the lower portion of the air bag with it installed and unless you choose to build Hector’s “Texas Bubbler” the air bag has to come off the coach for leak detection. At that point if the bag is old you might as well replace it.

    There are misunderstandings about the leans so here are a few statements of fact to consider. If your suspensions (note the plural) are air tight, you can lose all air in the coach primary, secondary and auxiliary air systems and the coach will not lean. Conversely, you can have a leak in one of your suspensions, the bus can lean and your aux air system can remain fully pressurized and not lose any air unless you have an automatic system that is trying to keep the coach level.

    You have three suspensions. A front, a left rear and a right rear. They all are independent and just happen to share an air supply. Go to the articles section to learn more, especially Hector’s writings. When you are dealing with the leans try to understand the basics. If you bring the coach to someone to service a case of the leans, and it is leaning to the left for example, and the technician starts spraying soapy water on the RH side, get the coach on the ground and drive away. You will be paying for on the job training. A suspension leak is always going to be limited to the 5 port Norgren for that respective suspension and all air bags, fittings and other associated Norgren valves for that suspension.

  • glen

    Member
    December 31, 2012 at 7:18 am

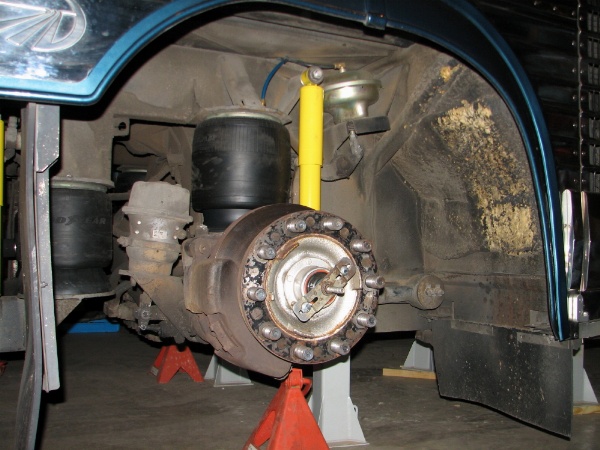
    Here’s what the XL rear looks like Joe when you get the wheels off.

  • Archived

    Member
    December 31, 2012 at 8:16 am

    Well, It was not my intent to hijack this tread but conversations must go on.

    My coach leans on the curb side rear about 1 inch overnight. The front and right rear are solid in the same time period.

    While in for previous service I had rear curb side 5 way valve changed and the drive airbag. The airbag was leaking at the bottom plate and was as Jon indicated hard to find. I suspect the other bag(s) is leaking in the same manner. I am waiting on a slab to be poured for the barn before I start jacking and checking things out so I don’t know for sure.

    I have watched Hectors video and have his files. I’ll get started on some basic troubleshooting once I have a place to work it. My sandy loom is not where I want to jack.

  • Gerald

    Member
    December 31, 2012 at 8:24 am

    Thanks for the link. Exactly the type of information was looking for. I have basic mechanical skills but unlike most engineers I will read the instructions or if not available will just tear it down to see how it works.

  • Tom

    Member
    December 31, 2012 at 8:24 am

    Thanks for the link. Exactly the type of information was looking for. I have basic mechanical skills but unlike most engineers I will read the instructions or if not available will just tear it down to see how it works.

  • Archived

    Member
    December 31, 2012 at 8:32 am

    Tom,

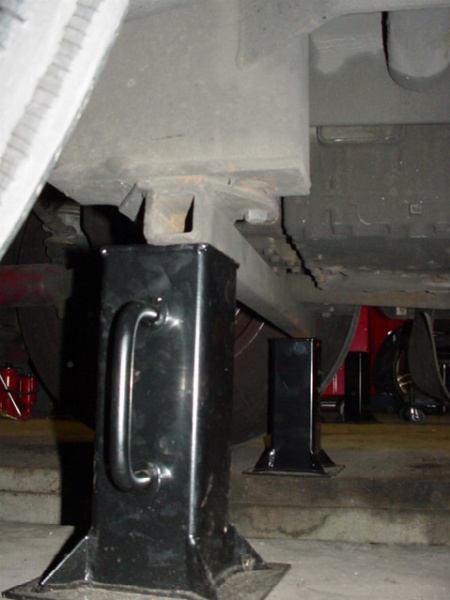
    Thanks for the photo. You seem to have a set of stands in those photos, the grey ones. I like this concept better than stacks of hardwood. Looks to be 4″ square bar and fixed length welded to 1/4 plate base with gussets on the corners. Can you pass on the dimensions for those stands? How many did you make?

  • AL

    Member
    December 31, 2012 at 9:46 am

    Notice that the air lines are color coded, blue for the suspension, Don’t forget threadseal, no teflon tape. Cut some steel plate if you are on loam to get a decent footprint, we used run out brake rotors, they worked fine as well.

  • Archived

    Member
    December 31, 2012 at 8:03 pm

    Joe,

    Those stands were designed and built by Jon and his Daughters company, Jamestown Advanced Products and he can give you the dimensions. They provided them at cost over a few years and probably built a hundred sets. They are no longer available, but I’ll let Jon comment.

  • glen

    Member
    January 1, 2013 at 8:39 am

    The last production run was a bit of a hassle so the company will not be producing any more. They were specifically made to support the Prevost chassis. They were produced in heights specific to the type coach they would support, such as an early XL, an XLII or an H3, all of which had different heights front and rear from the floor to the underside of the chassis support points.

    The heights were established based on the coach being raised using the level low system to their highest point, minus about 1/2 inch.

    The base was 3/16 steel 8″ square. Centered in the base was 4″ square tubing cut to the desired height minus 3/8″. The tubing had 3/16 wall thickness. The top plate was 3/16 thick steel, 4″ square. Gussets ran down the sides of the tubing to the corners of the base plate to stiffen it.

    As long as the materials are heavy enough they can be made from any sizes or shapes of scrap ranging from schedule 40 pipe to any plates suitable to spread the load beneath the support. When my bus is in the garage over the pit it is raised up and stands are beneath it so there is no fear if I choose to get in the pit and work on it that it will drop.

Page 1 of 5

Log in to reply.