Prevost Community Forums

Find answers, ask questions, and connect with our
Prevost Community around the world.

  • AIR LEAK PROJECT

    Posted by Archived on August 18, 2015 at 2:06 pm

    Like almost everyone else who owns a coach mine is leaking at a rate that dictates I address the problem. I would rather eat bees than chase leaks, but it has to be done. For me the starting point is the ability to isolate as many systems as possible to minimze running around checking stuff that is not an issue.

    I did the house air circuits several months ago. Now I identified every circuit and each one has a shut off valve.

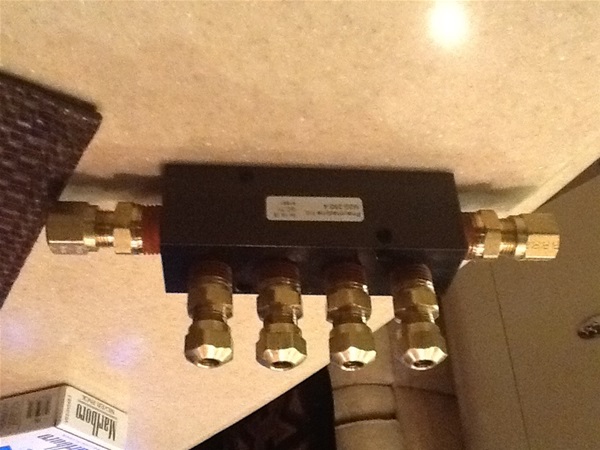
    Today I finished changing the 6 line manifolds with the push in fittings that are on XLII coaches (and maybe H3’s also). With each manifold I added shut off valves. I oriented the manifold valves exactly like the push in manifolds so anyone can follow the Prevost pneumatic diagrams as relates to my coach.
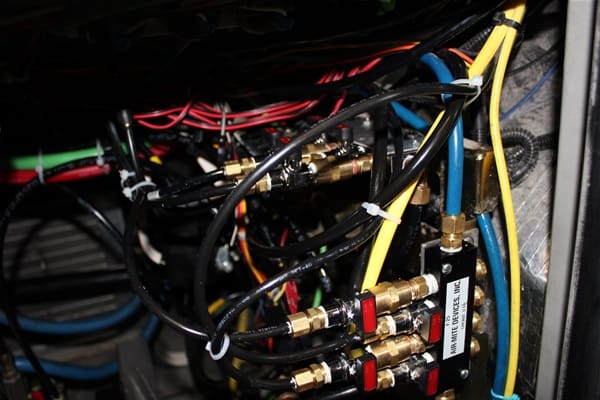
    It is kind of hard to see but each red handle is a shut off valve. I have four mounted horizopntally across the top and four mounted vefrtically. Each circuit has been identified.

    Not all circuits run through the manifolds so I still have others in the coach without shut off valves. I have to locate their source and try to decide if I want to bring them into the steer bay and install them on a manifold with shut offs.

    I already know with every circuit shut off that my leak rate hasn’t been reduced much so inadvertently I have learned something not on any of the three manifolds is leaking. It could be assiciated with the slide rooms, or maybe the suspension, or anything else not yet provided with a shut off valve. The objective is to use the valves to show me which circuits leak the most, and then eliminate the leaks in each of them, in order of importance.

    Right now I am lucky because the brake systems are so tight I can have the pressure remain at the level it was when I shut the bus down for weeks if not months. It is all the accessory circuits I am going to be spending time checking, starting with those that do not yet have a shut off valve.

    If you like working on your coach and want to spend rainy days spinning wrenches instead of painting the living room this is a good project. I got all my parts on the two six port manifolds except for the manifolds at WW Grainger. Usually they are a little high, but this time the prices were competitive, and I got the parts the next day.

    Jackson replied 11 years ago 18 Members · 36 Replies
  • 36 Replies
  • AL

    Member
    August 18, 2015 at 2:23 pm

    Jon, that really looks good.

    Part of fixing leaks is making the repairs and organize the lines/wires in a neat fashion.

    Both pictures show attention to detail and time you spent to obtain the finished project did not happen in a couple of minutes.

    Project = A+

    AL

  • Mark

    Member
    August 18, 2015 at 2:36 pm

    Thanks. Prior to my getting the coach someone got creative. They moved hoses around, they actually disconnected the Norgren water trap and modified the arrangement of the tubing. It was not Prevost judging by the hoses or fittings used, and I did not see evidence it was Liberty so part of what I did was attempt to identify where each hose goes and to put it back together so there is some order to what I am doing. I am awaiting a solenoid valve and some tubing because I want to shut off non-essentail circuits when the key is off so I still have a little more work.

    I hate trying to sort out an air system because unlike the electrical with numbered wires and good labeling we don’t have that in the pneumatic system. Once I get the unidentified circuits identified and decide if I am to add more manifolds I will start identifying leaks and repairing them. With rare exception all fittings are brass DOT compression. I had to use a couple of push in DOT fittings this week because I did not have the right size, but as soon as I get the right ones they are being replaced. I cannot believe how many push in fittings I have remaining just in the steer compartment.

  • Archived

    Member
    August 18, 2015 at 5:30 pm

    Get to work Jon I already did that to mine with shut offs and new manifolds big job no matter when you do it. Looks good Jon nice job. I don’t like those manifolds that you used because of the four plugs on the other side that are not used ,I had some made and only one on top and one on bottom and four on the side

  • AL

    Member
    August 18, 2015 at 7:23 pm

    Peter I know he want mind doing that to a CC so I will be in the driveway next week waiting my turn.

    Jon, Tom is one up on you, he doesn’t need any stinking air valves for slides, or is that one down !!!!!!!!!!

    Looks really good. You need to move to Vonore and work for Jeff, I am sure you two can work out a weekly cash deal.

  • AL

    Member
    August 18, 2015 at 8:21 pm

    Good replacement manifold Peter, Here is the one I found in KC which replaced the SMC manifold installed by Marathon.

    Lower photo is an SMC adjustable manifold. “O” rings are in-between arrow joints which dry out and leak over time.

  • Archived

    Member
    August 18, 2015 at 8:55 pm

    Very nice job.

  • Darcy

    Member
    August 18, 2015 at 10:09 pm

    I recently located the first leak I have found on my coach at this manifold. How does one disconnect the tubing in order to reseat it? I’ve never touched one. TIA.

  • Larry

    Member
    August 18, 2015 at 10:31 pm

    Let all the aux air out of Norgren filter or drain aux tank push hose in push brass ring in and pull hose out, it will come out easy with no air pressure on hose

  • Archived

    Member
    August 19, 2015 at 12:03 am

    Great idea Jon, I took your post last year and revised my air manifold with shut off valves as well, I found an aluminum manifold from a local hydraulic supplier. It is very helpful in diagnosing leaks in converter systems but you have taken it to an advanced level with valves on the prevost manifolds

  • Tim

    Member
    August 19, 2015 at 12:11 am

    I added a digital air pressure gauge in my coach to allow me to montior aux air system pressure from my coach. It allows me to check on pressure loss and flag potential air leaks on a timely basis.

  • Dan

    Member
    August 19, 2015 at 6:52 am

    Kyle:

    I’ve found that an open-end wrench just big enough to fit over the tubing makes a good tool to press on the locking ring on those fittings. Pushing in on the tubing at the same time helps, too. Then pull out on the tubing while holding in on the ring. I’m making it too complicated, but I’ve never done too well with them. Most of my experience with them is in industrial enviroments, not the clean (polished) steering bay of a Prevost. But they seem to be the way the world’s going. I would perhaps cut the damn thing off and get compression fittings, with nuts. They’ll last forever. Whatever you do, a square cut on the tube end is essential. There are guillotine-type cutters for this purpose (like a cigar cutter, lol).

    Have fun!

  • Tommy

    Member
    August 19, 2015 at 7:14 am

    Peter, I fully agree that not having the plugs on the rear is an advantage, but I learned after putting in the one for the house that the extra plugged ports gave me an opportunity to make some changes I did not anticipate when I started the project.

    I am starting to eat an elephant, one bite at a time. We travel a lot starting after Labor day so I will tackle the leak eradication project piece by piece over time. Today I am going to see if I can measure leak rates on the house, the chassis that is on the new manifolds and the rest of the chassis not on the manifolds. Where the greatest leak rate is will determine where I start. I hate doing this, and previously got 2 coaches relatively leak free, but this one has complexity and the number of fittings and potential leak points significantl greater than the previous coaches, and it has push in fittings, compared to the mostly compression fittings on the other coaches.

    What is going to make this one a bigger pain is the fact somewhere along the line someone messed with the air system so I am not sure how much of the pneumatic diagram I can trust. As I find changes I am trying to document them so the next owner at least has a head start.

  • Archived

    Member
    August 19, 2015 at 7:31 am

    Very impressive project!

    You gotta love that barn to do all your own work….

  • Archived

    Member
    August 19, 2015 at 7:41 am

    I agree Jon nice job buddy, Darcy nice job and the name plates on the manifold, the aux air gauge is nice to , Darcy did you get your black tank put in or did you do it yourself ??? hope it’s all good I loaded it on a truck for you last winter at Jeff’s . Jon did you find the hose back in the steering bay that Liberty modified for there level low it just is a push in fitting that joins the hose together it’s hidden hard to find mine was leaking bad replaced with comp fitting its stuffed in behind all the hoses and the firewall where the norgrens are in the steering bay

  • Tommy

    Member
    August 19, 2015 at 6:30 pm

    Peter, We installed our new tank from Jeff ourselves, it fit like a glove and we are pleased that we decided to proceed with this upgrade as our aluminum tank macerator bung had failed. We are very thankful for the advice and information shared on this site, and that Jeff has made available this stainless replacement, well worth the time and effort for peace of mind


Page 1 of 3

Log in to reply.