
-
Metal strips and Hardwood Floor Install Issue
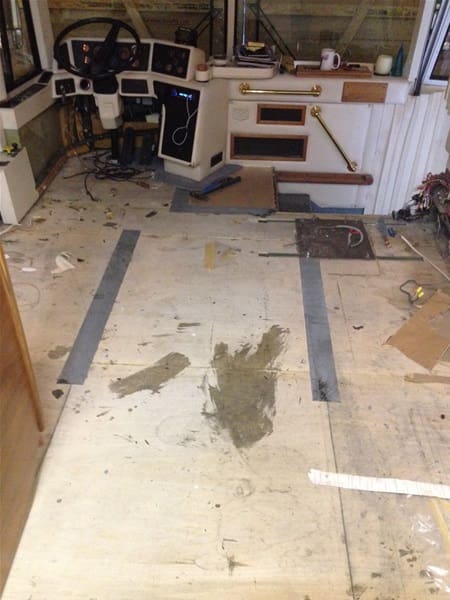
Posted by Liam on March 15, 2014 at 8:14 pmPulled my carpet today to do a glue-down of 3/4″ hardwood. Found these metal strips with lots of screws. Any idea what they are? There are two running front-to-back in the salon and then an L-shaped set over top of the section of floor where the sliding hatch is. Can I nemove them so my hardwood lays flat?
 Archived replied 12 years, 6 months ago 5 Members · 12 Replies
 -
12 Replies
-

Front ones is where your level floor was extended. There was a much larger top step/landing there once. The other two runninr length ways cover up where the pvc conduits terminate from front to back. I woud say pull them up and take a look and decide if you want to make this area unaccesable from future access. Option would be to remove the strips and screw the sub floor to the frame cross members. and do away with the overlap sheetmetal. FWIW
-
An alternative would be to rout the wood floor so the steel strips are flush with the plywood,
-
OK, I removed the strips and they were just to give the joint in the subfloor some strength. Not sure why they didn’t just run T&G plywood from side-to-side given the bus is nicely 8-feet wide. In any case, I now am thinking I should glue-n-screw some 5mm plywood underlayment side-to-side to unify the floor before running my hardwood front-to-back.
If someone with prior experience has a better method – please yell!!
I do have one issue though. If you look at the seam in the second photo, it runs front-to-back over the chassis beam just over the front axle. While this one has a big gap, it is rock-solid. That same seam on the driver’s side which is tight, the edge of the center section of plywood dips and bounces for about a 1-foot section. Hard to believe they would miss the beam on the joint or is there something bolted to the side of the beam under the joint that has come loose?
My instinct is to pull that center section of plywood and reinforce under the joint, but I must admit to being mystified by how the plywood panels are attached. Each sheet (about 4’x5′) seem to be just attached by large Torx-head screws “in the field” of the panel. I see no fasteners along the seam running front-to-back. It looks like screws are only into the stringers which connect the beams and walls side-to-side. Are the seams glued to avoid screwing into a hardened beam? In any case, need to know what I am facing if I try to remove and replace the panel – or do I just put the underlayment down and not obsess about the one soft spot?
Thanks.


-

from the factory that was solid. converter or somebody gaining access to that area has cut it out and replaced with removable panels. If you have cruise Air or something else in spare tire compartment that might be reason. With that panel out you can get to the front end of all the air lines ,power steering hoses ,coolant lines ,electrical cables,everything else from front to back. That area was two layers of plywood from factory. You could take it up and put a support piece up from bottom is soft area or ck the material they used and go back with thick oak boards instead of plywood since your going to floor over it for finished product. Bob
-
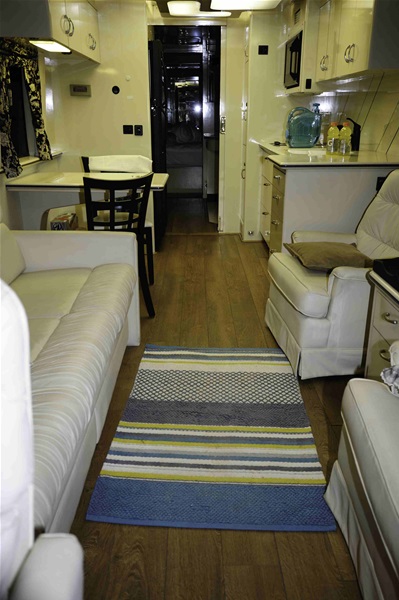
When I replaced the carpet in my 93 XL I used laminate. I glued the center board only. This keeps the floor from moving. I did not glue the other boards. They need to be able to expand and contract. They are only held in place by the tongue and grove made into the laminate. Pain to get assembled in such a narrow space but it seems to be working well after a year. I do get some “pop”ing sounds after a weather change and I walk on it. If that will bug you then glueing every board may be ok but I wanted it to be able to move.
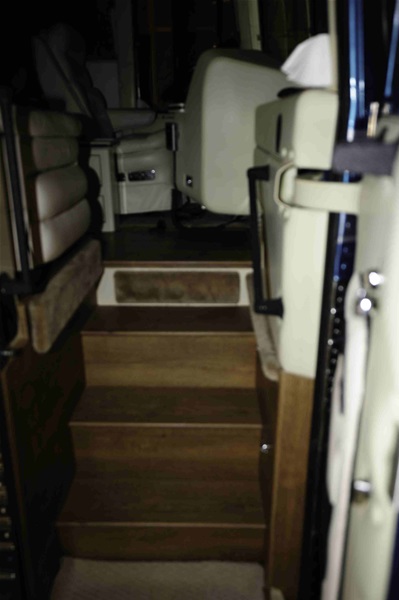
I did completely glue down the boards on the stairs (treads and risers) and the side walls of the stair well.
-
Wow, in particular I like how your stairs look. Tell me more about what you did there?
-
Robert, thanks for all the help. If someone ran a circular saw down over the beam and miss-measured I guess that would explain why the one spot is soft.
Tell me more about the composition (layers and thickness) of the floor installed at the factory and what converters like CC typically did?
The carpeting is original to the converter so this must have been done from the start. Do converters typically have to pull-up sections of floor? This section is right above the front axle so no bay underneath.
Thanks
-
I used normal flooring boards on the two side walls, glued in place. I ripped the bottom most board to width such that I did not have a joint at a tread elevation. In other words a board runs from the riser to the metal trim on the door. The riser is back cut so the cut out for the riser is angled. The cut is flush at the riser and tread but trimed short next to the metal trim on the door. You want to cut that short such that you can install in a vertical orientation a rounded trim piece flush with the metal trim this piece will be rabbited on the other long edge to cover the board ends on the side wall.
For the best look just make sure the boards are installed true horizontal.
On the hinged side of the door I installed a vertical board behind the hinges and capped the long edge with another trim piece.
The risers were installed next glued in place, trim close to length for the best look and you can use some collored calking if you have a small gap.
The treads were covered last and glued in place. I used a full width board along the front edge and ripped the back board (along the riser) to width. I used a stair trim bull nose for the very front edge. It was set to overhand the riser below by about 3/4 inch and the other edge was rabbitted to cover the edge of the tread board.
Edges around the lower hinge opening and support for the co-pilot chair were finished with various trim pieces.
The use of the limited trim piece availablity on the laminate was the most difficult part and time consumming as each piece had to be marked and cut by hand. It would much easier to use solid wood and make the trim pieces. But I choose the laminate because it was cheep, and was prefinished.
I used 3/4 inch quarter round to finish the main floor edge where it is adjecent to the air duct / wire chase / cabinets. So it is allowed to float on the flooring it is either glued down to the top of the flooring or stuck down with double sided carpet tape. My kitchen cabnets and refer enclosure have verical rounded edges. Cutting 3 wedges of quarter round to make a 90 degree bend with a 3/4 inich inside radius was tedious but looks good. If I have any long term issues I expect it will be with these wedges which are glued together and then glued down.
If you wnat more pics of the trim or stair well let me know and I’ll try and get some but it may be a while .
We are headed to the keys tomorrow. Raining and 45 here in SOUTH Carolina and I need some sun.
-
Joe how are the boards holding up with wear? Do they get scratched easy?
-
no issues at all on the main flooring including the stairwell. They have been in about a year, since I still have to work we have used the coach for a weekend to the smokies, 7 weekends of football with a lot of visitor traffic and the Branson rally.
The finish is “warrenteed” for 50 years, since we don’t plan to full time it will likely outlast the coach. If not it was less than $500 in total materials.
I have dropped tools, like a screwdriver and expected to see dints and dings. So far nothing.
The only problem I have noticed is our co-pilot seat is mounted on a box which contains the stair well cover when retracted. I put flooring on top and sides of the box. That means there is a square corner at the intersection of the stairwell and main aisle. When I was cleaning for this trip I notice a piece (1/2″ x 1/2″) of the trim had been knocked off. The co-pilot chair skirt covers it and it is not visible.
Log in to reply.