
-
Norgren Valve
Posted by Tim on October 14, 2016 at 11:52 amI have a norgren valve in the rear engine compartement on the passenger side. This morning I had to move the bus so I let it air up to 130 psi. When I turned the bus off and did some routine checking, I heard this norgren valve leaking at one of the ports, but there is no air line attached.
It stopped when the Aux Bus Air hit 90 psi. I then started the bus back up to 130 psi, shut it off, and the leak stopped. I took the soapy water out and still no leak.
When it stopped the first time, it sounded like some internal valve shut off to stop the air.
Now that it’s not leaking, should I simply monitor it or is there some type of adjustment I can actually make to the norgren valve?
FYI: All my norgren valves were replaced at ETLC last year, but that doesn’t mean one can’t fail after a year …
Archived replied 9 years, 12 months ago 8 Members · 17 Replies -
17 Replies
-

Unless the Norgren valve is electrically operated if has two sources of air. The air it controls is the larger suply line to the valve body. The valve opens or closes that air flow depending on what it does.
The second air to the Norgren is the “pilot” air. That is the air from its control source and as that air is supplied or stopped the valve opens or closes.
So you can have leaks in the control part of the valve, and that air pushes the spool internal to the valve to open or close the main flow of air. The air flowing through the valve can also leak. It can leak sideways past the valve spool O rings and out the end caps, or it can flow past the spool to the device it controls.
A Norgren valve is a simple device and with a phillips screw driver and a few wrenches you can have it out, bench tested and if you choose you can fix it if it leaks. Or you can throw it away and start with a new one. The key for your purposes is to try to determine where the leak is, and how it impacts the coach.
-
You’re right Jon,
I have easy access & it looks simple to take off & repair/ replace. I’ve never tried to test one, but I’m assuming you would use compressed air on a fitting to determine a leak. But I’m not exactly sure how to fix it unless there are fittings to take off & put back on and re-seal the fitting where the leak is.
But right now, it’s not leaking so I’ll wait & monitor it.
-
Take out the 4 phillips screws on one of the end caps and the entire valve will come apart. Preferably the end cap with the actuator. If you can get the screwdriver at the screws it can be repaired while still bolted to the chassis.
-
Well another dumb question, but if I take the end cap off and see the valve, what is the actual repair on the valve to repair the leak? Do I need to reseal something?
I assume there’s no video on this in the library?
-
If you remove an end cap a spool with several o rings will come out.
That’s it. There may be a spring or an acatuator but that’s is the extent of the components.
The spool will have removeable O rings or you can get an entire spool assembly with the O rings.
A failure to seal is either due ot aging hard rubber O rings or corrosion within the valve body from moisture. If the failure is due to corrosion you need a new valve. If it is just aging O rings it s serviceable.
My personal observation is by the time I service a valve and then bench test it I have more time invested than the cost to just replace the whole valve so I no longer repair them, but just buy a new replacement.It was a worthwhile exercise to rebuild all my Norgrens and then bench test them, but apart from the educational experience I learned it was more cost effective for me to just buy new ones because the time involved in rebuilding and testing was about an hour per valve, plus some time for dealing with stubborn end cap screws and finding valves that had internal corrosion anbd thus were not rebuildable.
-
Tim,
If you’re referring to the Norgen mounted on the bulkhead, rear engine bay curb side, that’s for the air door that opens for your backup light when you place the tranny in reverse. It will have two very tiny airlines that run from the Norgren up to the air door. I had to replace mine recently because the Norgren was leaking at the valve assembly.
-
Mystery for me solved. I couldn’t figure out what the purpose was for the Norgren back there.
-
Thanks Tom,
Maybe that’s why it didn’t leak when I restarted the bus since I didn’t put it in reverse. Tested it again in Reverse and the Valve is leaking at the upper right port thru one of the holes. Must be a bad O-ring. I had this changed out in November ’15 at ETCL. Will have to check if it has a one-year warranty on parts…
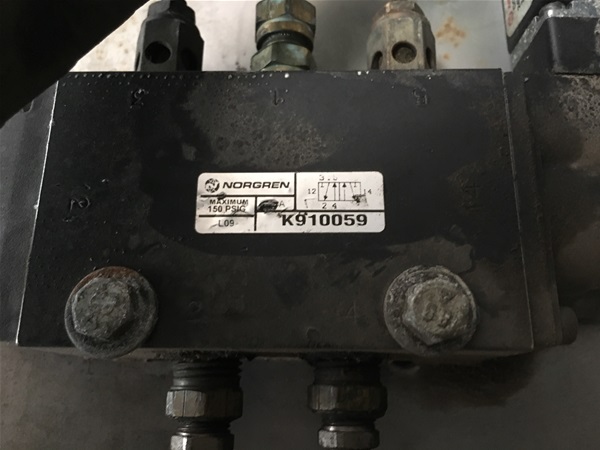
Looks like replacing it is the best option. Did you get it from Prevost?
-
No, Jeff gave me the name of the place that had them and they told me it was the last one they had. Very expensive as well, over 2000 at Marathon, so that may be your only option. I couldn’t find it anywhere else. I’ll dig out the receipt if needed.
-
Thanks Tom,
I’ll call Jeff Monday since he put it in. If that company has none, Marathon may be my only option.
-
If it is relatively new and the air system has been dry I don’t see a need to replace the entire valve. It is likely the bore where the spool slides is not corroded and is highly polished so this may be a case where spool or O ring replacement makes sense.
I cannot see all of it since the photo is just of the valve body, but it appears as if it is a solenoid (electrically) operated valve instead of the pneumatic valves typically found. An alternative to rebuilding or replacing the entire valve would be to buy a new three port, pnematically operated valves such as those used in about 5 places on the coach and just swap out actuators. Even if you buy the entire new valve from Prevost it is going to cost 1/3 the price of the valve shown.
-
Jon,
I’m not sure why there are different Norgren Valves used, but when Jeff replaced all mine last year, there was seven of one model number, two of another model number, and this one, which seems to be the most expensive (for something I rarely use).
-
The difference is in how they are used and actuated. The majority of the ones Jeff changed were for the suspension and they are mostly what we call 3 port pneumatically actuated. Two sounds like they were 5 port with pneumatic actuators on each end. The odd one is apparently the one we are discussing and it is a 3 port electrically operated.
Each valve has a different function. But while they may have differences they are modular so by swapping parts on a body you can create a different valve.
-
Tim,
If you don’t want to fool with it now, just unhook the feed line and put in a plug and forget it. I did that for several months until I got time to replace it. The light will come on when in reverse, but the door won’t open.
Log in to reply.