
-
Air bag/Prevost question
Posted by Ace on February 10, 2012 at 9:52 pmPosted on Friday, February 10, 2012 – 10:44 pm: 

Below is a link to picture of two air bags. The old is upside down on top of the new one to show a comparison if the mounting stud length differences. It’s about a 1/2 inch difference and after being on the phone about a half a day, Prevost says these are the correct bags that superseeded the original!
Sure they fit but the stud doesnt allow for a washer to be used and the nut only goes on far enough that still shows about a thread to a thread and a half. In other words, the stud doesn’t even come to the end of the nut!
Has anyone else seen this as a problem? These are Goodyear bags with a Prevost part number 630259.http://i1203.photobucket.com/albums/bb394/Goldbus/0a2f5085.jpg
Archived replied 14 years, 6 months ago 5 Members · 14 Replies -
14 Replies
-

Ace,
It will help if you put your bus year and conversion as a signature in your profile so people know the vintage of your coach.
Is this a front, rear or tag bag? My steer and tag take the 630259 and my drive are 630104 and my shell is a 1996.
-
Ace,
This may be bad information but my brain seems to recall I used half nuts on something on my previous coach and it might have been the air bags.
Having an H3 your air bags may be different than what most of us now use, but Prevost went through a rather painfull consolidation of air bag part numbers several years back to minimize the number of variations they carried in stock. That consolidation had quite an impact resulting in some coaches not getting the correct air bags so the leveling system was compromised, and others needing to have the hole for the air fitting enlarged so replacement bags would fit. I am sure by now if there were issues they have all been sorted out.
Your photo on the new bag shows the black paint going up the stud about the same distance as the thickness of the base plate on the axle. I think the plates are 3/16 or 1/4″ thick so unless something is trapped beneath the bottom can you should be able to get both a washer and sufficient threads on a nut onto the stud.
I cannot help you because I changed air bags when the 630126 air bags were available. Maybe Tom can post a picture of his current bags to show how much nut engagement he has.
-
For some reason this morning, I can’t post a picture or use the Link, so we might have a problem or it’s on my end. I’ll get a picture up when this get’s sorted out.
-
Ace…….
You asked a question on another site. Email me jon @ prevostcommunity. com
-
Ace,
Here’s a couple pictures of my tag and drive bags and as you can see, there’s very little thread showing from the top and bottom nut.
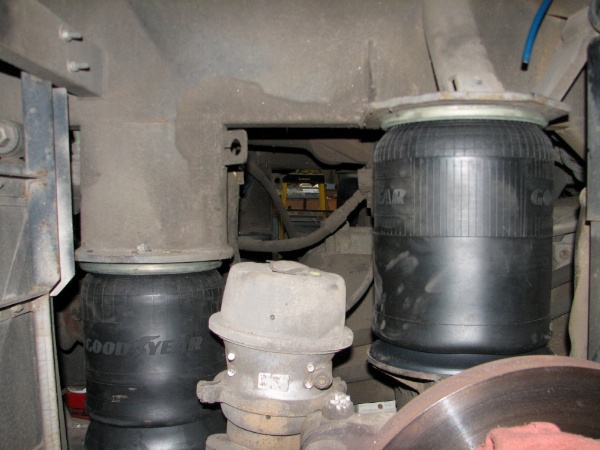
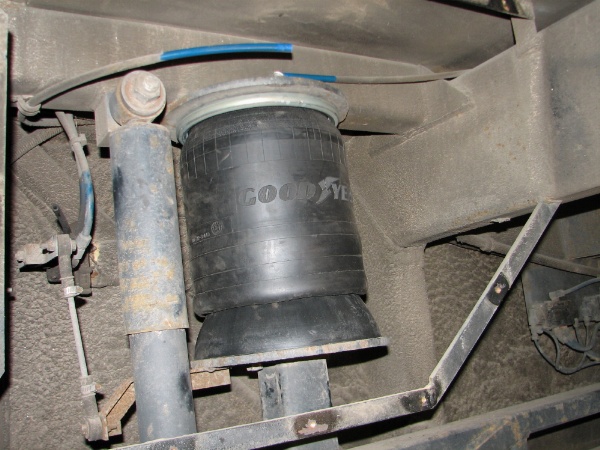
-
When I did the air bags on my last coach I ran into the same issue. The holes in the plates were the same diameter as the studs so I was not concerned with the washers and discarded them, I used loctite on the nuts as the stud was to short to engage the nylock. If the stud is 7/16 and you have 7/16 sticking through the plate then the stud will lose no strength.
When I did the bags on my new coach one on the rear axle had no nuts on the bottom at all, this bag was original judging by the date code. Really when you think about it the studs on the rear begs have no pulling force on them as the bag always has a compression force working against it to hold it in place, the studs just keep it from moving around or sliding out of place.
-
Changed 4 air bags on rear, 2 tag and 2 drive and also changed all air lines feeding each bag. I also changed both air gauges in the dash to new VDO gauges.
Bus airs up to 120 lbs with no issues. Releasing the parking brake, the air drops to about 110 +- lbs.
When air reaches 120 lbs on both gauges, the air drier spits and all seems normal. Applying foot brake numerous times makes the air pressure drop as usual but then rebuilds to 120 lbs without issue.
Parked the bus with both gauges showing 120 lb and I measured the distance from ground to bottom of fender above drive wheels and both sides measured 46 1/8 inches. That was at 6pm yesterday! Today I went and checked to see just how much it dropped and it measured 43 inches on both sides. My concern is, BOTH dash gauges read ZERO! Where should I look for the problem or is there none?
-
Ace,
The answer is not easy to answer. The two dash gauges are brake system air and the air bags are aux system air. You did extensive work on the aux, but all of that was downstream from the 5 port Norgrens found on motorhome and entertainer shells so losing air bag air should have zero impact on brake system air.
But you did change gauges so the first place I would look is at the air connection to the gauges. That is a known trouble spot. When parked with the emergency (parking brake) applied you will have no brake system air pressure beyoind the R-12 relay valve, the air tanks, or the brake treadle so if it is not the gauges leaking at the air connection those ppaces are where I would look.
I do not know if your coach started life as seated and thus lacks the level low and Norgren valves or if it did have the level low system. If it does have level low and your aux drops below 30 or 35 the rear Norgrens dump air and that explains why the bus dropped.
Leak detection is dificult, but the method that works best is to look at what has changed first, and if not any leaks there, then( to use Hector’s terms) start with the low hanging fruit, generally following the air path as depicted on the Prevost pneumatics for your type and vintage coach.
-
Sorry to have missed this with a timely answer.
For the future anyone else, you may use a jamb nut of the crimped lock nut style.
They are about 1/2 thickness of a regulsr nut as Jon mentioned and available in grades 5 and 8.
These nuts in this application should have ample thread contact area.
JIM
-
Thanks for the help guys!
I brought the bus home from the shop where it sat for a few days before I could fine time to bring it home and after it aired up to 120lbs everyone at the shop says it stayed up for a couple days before settling down.
When I go to pick it up and bring it home,I aired up, drove it home without issues! After parking it in its spot, I shut it down and observed the gauges. Both NEW gauges read 120lbs. This was at 6:03 pm. At 7:15 pm the gauges read just above 110 with no apparent drop in suspension! At 7:30 am the suspension is all the way down on the tires and both gauges read ZERO!
What gives?
-
Thanks for the help guys!
I brought the bus home from the shop where it sat for a few days before I could fine time to bring it home and after it aired up to 120lbs everyone at the shop says it stayed up for a couple days before settling down.
When I go to pick it up and bring it home,I aired up, drove it home without issues! After parking it in its spot, I shut it down and observed the gauges. Both NEW gauges read 120lbs. This was at 6:03 pm. At 7:15 pm the gauges read just above 110 with no apparent drop in suspension! At 7:30 am the suspension is all the way down on the tires and both gauges read ZERO!
What gives?
-
Ace,
First, my response is based on some assumptions. First, your gauges are the gauges Prevost uses for brake system pressures. Primary and secondary. The second assumption is nothing has been changed on the coach to mix the aux system with the brake system. By that I mean nobody has tapped into brake air for any purpose other than brakes.
Here is basic information that may help you isolate and understand the air systems. When you park a bus there is no air pressure beyond the brake system air tanks, treadle valve or relays. The fact your brake system gauges went to zero suggests there is a leak in a component or component common to the primary and secondary brake systems. Air dryer? Treadle? Leaky fitting? Leaky or open petcock? Etc.
If you are looking for a priority, start making the brake systems leak free. They should sit at XXX perssure for a very long time. Mine will not drop below 100 PSI even after sitting 3 months.
If the entire coach is settling down evenly I need to know if you have a level low system because that kind of issue has me puzzled. I cannot think of a single point that would enable a pressure loss in all the air bags with the level low system. As a point of information on a conversion coach made afer 95 or 96 auxiliary air pressure can go to zero and the bus will not drop if the suspension valves and air bags are leak free. On coaches prior to that if aux pressure drops below 30 to 35 PSI the rear will drop when the 3 port Norgrens in the rear open the path to exhaust tag axle air.
You are dealing with at least two unrelated issues. The starting point is to do some basic leak detection on the brake systems and I would suggest you also confirm the check / protection valves are functioning also because they might be a contributing factor.
-
Ace,
I see on another forum that your coach started life as a seated coach. I suspect the brakes are the same as on our conversion shells so once you get that sorted out you can move onto the suspension issues.
The best way to analyze where a leak might be that allows the entire bus to settle down is to start with a study of the pneumatic diagrams for your coach. Your suspension system and our level low system on conversion coaches are not the same and I can’t begin to give you hints as to where to look.
http://prevostparts.volvo.com/technicalpublications/en/manuel.asp
That is a good starting point. Remember you have to select the correct version of coach to get to the proper diagrams. I enlarged the pneumatic diagram for my coach and printed “tiles” that I pasted together to make a 2 foot by 3 foot drawing. I then literally trace lines in the system using a highlighter to make it easy for me to understand the air path. Prevost has done an excellent job pictorially showing fittings and components so it becomes easy to compare the diagram to the coach. A lot of your questions will be easily answered if you take the time to study the system on your coach.
What will not be so easy is the attention to detail and the effort required to seek leaks and repair them. But if you do that and get ahead of the problem maintaining a near leak free coach becomes a lot easier.
Log in to reply.