
-
Replacing Holding Tank Valves on a Royale
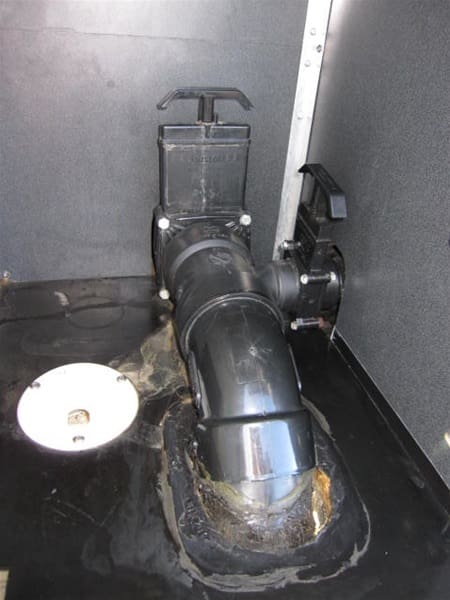
Posted by Brian on March 7, 2014 at 9:56 pmSome jobs you just keep putting off and this is one of them. The time has come however to replace the holding tank valve manifold on our 99 Royale. Due to the fact that both valves need to be installed at the same time, it doesn’t appear there is enough room to get them both lined up with their respective flanges. Am looking for some pioneering soul who has been through this adventure. Here is a pic.
 Davy replied 12 years, 5 months ago 10 Members · 12 Replies
 -
12 Replies
-

I think you can just un bolt and replace just the valve be careful if you break the flange on the pipe where the bolts go through you will have to cut pipe re glue new flange on or take it out of holding tank they are glued on to pipe I did mine for water tank drains there are two on mine . Just putting in new valve is easy , just new valve and gasket make sure you get same valve some of them are Bristol hard to find they need to match flange. Why are you replacing it what part is leaking or not working????
-
Brian
Bristol brand was bought outby Valterra. So, most RV parts house have Valterra. Be glad the valves aren’t Thetord, tougher to find. Vintage Airstreams use them
Looks from your photo, the whole thing comes out once you remove all screws. Probably a gasket on either side of valve, clean, replace. I wouldn’t b too concerned about the grey water, but black water tank without a valve is a good time to give your bus a case of the leans..-)))
-
The ears on the flange break or get crack in them then they start to leak its a real pain in the ass to take them out of tank all the wood has to come out , there is no room to cut pipe and glue new flange on pipe without taking wood out like I said valves easy unscrew replace
-
Ditto, easy to replace, just don’t break the pipe mounting flange. They simply slide out.
-
Assume you have to dig out all the silicone, then remove all bolts on the gray and black pipe and out it should come.
Nice to see you here Brian…
-
Brian,
I replaced mine about 2 years ago. Dig out all the silcone from around the large pipe where it goes thru the floor and that will give you some wiggle room to work with. It is a pain to get everything lined up and reconnected but it can be done.
-
Thanks for the feedback. Am concerned that the ABS glue won’t give me time to make the last fitting tweeks. Will refrigerate the parts and glue before assembling. Sweatsville!
-

Brian is it a leaking slide valve or cracked pipe that leaks? Do you have a thrid valve under the bus? I have a thrid valve and I will drain the black then flush the gray in to the black several time to clean it then run the rest of the gray out to clean the hose.
The other thing is if you have a clear section in the system it really helps knowing when you have a clean flush.
I was at that Palm Creek RV park in Casa Grande AZ and they required you to keep your hose off the ground, so I made a sloping board to support the hose. What a difference that made when it came time to disconnect.
-
What glue? The valves have o-rings to ensure they are leak-free. Otherwise, it’s just teh 4 bolts. You may even be able to do the change our without disrupting the silcone in the bay floor.
-
Brian, if you have to replace glued fittings, try dry fitting things together and putting a line/mark on each side of the joint lining up with each other, then when you glue you have an idea of where the 2different fittings need to be to line up. Then take it apart and glue it for final assembly. You should have time to tweak things but this increases the comfort feeling for success. It has worked for me many times in the past.
-
Greg, Gil, Peter,
I had planned to change the entire manifold from the inner valve flanges out. Was making the change due to the bayonet fitting extended almost 6″ below the bus. Since it’s on a 45 degree angle it had been scuffed and repaired several times over the years and sure enough started to leak again. Peter warned me about cracked ears on the inner flanges and sure enough the first one I loosened was cracked. I squirted in some styrene glue and tightened her back up. New plan. cut off the bayonet and shorten the extension under the bus. Probably should have done it this way from the start but it seemed like a good idea to replace the valves since they’re 15 years old and a little sticky (yes I lube them). The old lesson is re-learned…..the simple fix is usually the best.
Am on the road so this will fix me for now. Will probably need to re-plumb the whole caboodle at some point.
-
Brian if you replace all the pipe start at tanks that way you can check sensors where they go into tank if you have that kind, they can rot off , if I was going to do that I would make it so the wood was on hinge and that way you could open bay door and open access door to pluming and work on it way easier no screwing around. Royale Phoenix makes a tank monitor kit that is 100% right on it blows air in a tube I had it put in last fall , it was well worth the money about 14000 I think you can buy it from them and install your self , easy to do !!!!
Log in to reply.