
-
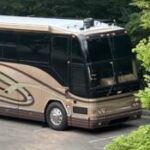
2001 H3 Vantare roof air install
After my trip to Spearfish SD in July and intermittant a/c from the RVAC and fore and aft Cruiseairs I decided to make a change. I couldn’t find any info on anyone retrofitting a 2001 H3 with roof airs. Featherlite couldn’t tell me what was up there in the ceiling , just said be careful. After running up and down my 12 ft ladder many times I marked my spots for three units and a 4th over the bathroom hall if needed. I parked the bus outside in the hot sun and the ribs showed easier thru the roof skin. I had taken one of the air distribution boxes for the ceiling inside and decided on my placement by holding it up. I then looked outside and put red shop rags on the ground to mark my spots, got on the roof and marked between the corresponding ribs.
It took me four hours to mark and to cut the three 14 x 14 holes. I then drilled holes in all four corners of each 14 x 14 hole to mark my inside cuts by drawing lines between the 1/8” corner holes. I set my skill saw blade at a ½” depth. I pulled the skin off to find three inches of blown in insulation, cut that out and discovered metal ducting running above where the mirrored ceiling was recessed. I could have ducted my roof airs but wanted max flow into the cabin. The duct runs from just behind the seats all the way to the shower above the ceiling recess.
The next twelve hours were spent carefully cutting out the mirrored plastic with 3/8 plywood backing from inside the coach with a jig saw and air hacksaw with a blade shortened to about an inch. Very tedious but the mirrored ceiling is easy to cut. That gave me access to the ducting. The duct runs north-south and plastic runners branch off the sides to the vents for the original RVAC. Side note: I had done this same install on my Newell eleven years ago and had no way to run thermostats so I used Dometics with manual controls. I had already ordered my Penguin ll’s with manual ADB for the Vantare install. I didn’t know how I was going to wire the units but after a lot of probing and thinking I found the duct from the RVAC going to the ceiling on the passenger bay above the RVAC. I used a camera snake to find my way to the top just to the right of the frig. My buddy and I used a cable fishing tool to run rope up to the ceiling duct to pull the Romex for power. I then discovered I could have run thermostats the same way but for my tastes I like the simplicity of the manual controls. This took another couple of days work to get the Romex run up to the units and down into the RVAC bay roof. I found some conduit in the top of the bay for wire runs to bring the wire over to the next bay where my power panel is located. The first four breakers are as follows: 1-RVAC (30 amp) 3- RVAC (30 amp). I ran wire for another unit above the hallway by the shower in case it is needed. I disconnected the power from breakers 2 and 4 (20 amps) that were for the fore and aft Cruiseairs. Breaker 1 powers the first roof unit Breaker 2 powers the second salon unit, Breaker 3 is still powering a Cruisair unless I need it to power the hallway unit in the future. I did swap the hot wire for the fore and aft Cruisair so I could use it in the front salon in case it is needed. Breaker 4 powers the bedroom unit. The A/C switches in the control panels match the roof airs so it looks factory.
It measured 5 inches from the roof to the bottom of the mirrored ceiling. Roof skin, three inches insulation, air space, mirrored ceiling with 3/8 inch plywood adhered to the back. My ride height was 12’ 6” without roof air, added 11” with roof air, new ride height is 13’ 7”. I was going with Coleman Mach 8 +’s but they aren’t available right now, they save a further 3”.
I’ll post pics when I can figure out how to convert my Apple HEIC photo files to JPEG for the site.
Feel free to contact me if you have questions.
Steve Magown
2001 Featherlite H3
West Monroe, LA


Log in to reply.