Prevost Community Forums

Find answers, ask questions, and connect with our
Prevost Community around the world.

  • Bay TV upgrade/Add

    Posted by Walter on February 13, 2016 at 11:17 pm

    Our bus came with nothing in the bay that would have been the usual entertainment bay. I think that it probably had a setup in there originally, but our bus had a sort of half HD upgrade at some point recently and I believe they just took out the entertainment bay all together rather than updating it.

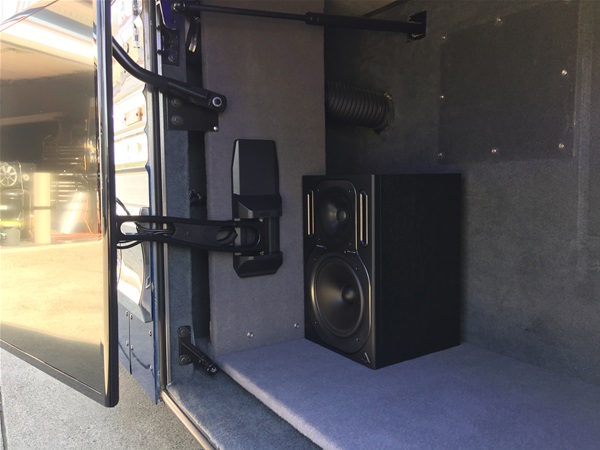
    We felt like we wanted it for watching tv, listening to music, and tailgating so I put a TV back in there. I had some studio speakers on the other side of my garage that I didn’t use that much so they got donated to the cause. I bought a Bluetooth car stereo to run the audio and it feeds the powered studio speakers.

    Here is the big pic. I didn’t to a cabinet and drawers like you see most of the time. You can see the car stereo at the top on the right-ish. To the right of that is an ON/OFF switch for the whole setup.


    Here it is swung out – you can see the speakers well here. And the big space to store stuff. The blue you see at the bottom is some blue LED (i Love that stuff!) that I put in that turns on and off with the setup so you know if it’s ON or OFF.

    ON

    OFF

    The car stereo that runs the audio. The TV is hooked into the main bus AV system so you switch what’s on the TV with the iPad remote control just like the other TV’s inside the bus. Also, those wires on the right are now covered with braided wire cover… I was waiting on it from Amazon.

    And here it is at night:

    AS USUAL, I didn’t take a before pic…. I’m not good at planing out the photo part of the process. Sorry – but just imagine a bay with nothing in it. That was the before.

    Thanks!

    Walt

    Fred F. replied 9 years, 8 months ago 13 Members · 16 Replies
  • 16 Replies
  • Tim

    Member
    February 13, 2016 at 11:59 pm

    Walt, that is very nice!

    Mark

  • Bryan

    Member
    February 14, 2016 at 7:44 am

    Nice job Walt..

  • Ted

    Member
    February 14, 2016 at 12:18 pm

    Super installation, Walt. There’s nothing better than great sound at the campsite. Love the blue LED as well. Nice work.

  • AL

    Member
    February 14, 2016 at 1:23 pm

    Very nice work.

  • Bryan

    Member
    February 14, 2016 at 8:42 pm

    Thanks everyone for the kind words. Makes it fun to post.

    Walt

  • Archived

    Member
    September 28, 2016 at 12:40 am

    I’m about to install a bay TV like Walts with a similar 90 degree swinging bracket against the side wall (not the rear wall). Anything to watch out for when it comes to drilling through these walls besidesthe obvious stuff on the other side ? No Prevost chassis wiring in between these areas is there ?

  • Bernard

    Member
    September 28, 2016 at 6:53 am

    Very professional looking install…looks great

  • Corey

    Member
    September 28, 2016 at 9:05 am

    Wow looks great! You have more space left over with that big TV than we have with the little one and the cabinet. What’s the red wire on the bottom/right of the head unit?

  • Hugh

    Member
    September 28, 2016 at 9:47 am

    Very nice Walt!

  • Archived

    Member
    September 28, 2016 at 9:18 pm

    You are inspiring me to get to work on mine. I kept trying to figure out how to modify the old unit, when it looks like the best thing to do is tear it all out and start with an empty hole! Looks great!

  • Dick

    Member
    September 30, 2016 at 3:28 pm

    On our bus (Marathon conversion) if you tried to put the mount on the side wall – it wouldn’t allow you to open the TV out properly. I had to make a board that I mounted to the floor and ceiling that was set out from the side wall so that the arm could swing out a full 90 degrees. As far as your question, on ours I don’t think there is anything”inside” the wall. I believe the wallt is just a 3/4 plywood. Just don’t hit anything behind the wall.

    The red wire is the headphone output of the TV. The car stereo I bought has an AUX input for iPods and stuff in that right front corner. It would have been better to have the input be in the rear of the stereo… but you know… I didn’t realize that until I had it all together. UGH. But…. it’s not so bad. It only bothered me for a month or two!

    The car stereo amp output is connected to the speakers – which are powered speakers. They are the cheaper brand of studio speakers. I have them in my garage. The are nice and loud and have good bass. So watching movies is almost as good as inside the bus. The neaghbors can hear it well too!

    Here are the pics so you can see what I mean about the outset piece I added. It’s the piece that the mount is drectly screwed to. In a way it’s nice because you can put all the wiring behind it. I also hid a lot of wiring under the floorboard I made. It’s a “sbufloor” that is about 3/4 in above the main floor. All the wires run under it in the back so you can’t see them.


  • Archived

    Member
    September 30, 2016 at 6:19 pm

    Very create. Lots of ideas here.

    What is the device to the right of the car stereo?

    Do you have the car stereo wired into the chassis 12 volt or the house 12 volt? The powered stereo speakers; 12 volt or 120 volt?

    What material did you use to cover the “sub floor”?

  • Peter

    Member
    October 1, 2016 at 12:32 am


    The device to the right of the car stereo is a simple 110 V lights switch. But, it is a super cool one from Lowe’s rather than the typical little toggle switch you see in the house. This bus must have had some type of entertainment system in this bay before. There are a lot of different wires and coax cable’s and video cables that were stored behind a cover in the upper right corner of Bay.

    What I did was use the 110 V that already came into the bay and switch it with the light switch to turn on and off a plug inside that cover where the speakers and the TV are plugged into. I also have a little 12 V transformer in that same plug so when the light switch turns on it sends a 12 V switch signal to the car stereo to turn on Just like a car stereo would do when you turn the ignition on to your car. The car stereos main power comes from 12v already in the bay. Presumably that is house 12 V.

    That 12 V transformer also feeds the colored LEDs I installed under the little subfloor so that you would have a visual reference that that switch is on.

    Basically when I flip the switch on the car stereo comes on the speakers come on and the TV comes on with the flick of the switch . And of course with one flick of the switch everything turns off. That’s why I set everything up to work that way to make it easy to turn it all on and off. I thought about trying to add everything to the remote control system to turn it on and off but felt this was a more positive way to ensure everything was off .

    The subfloor is made from some five eights inch hardwood ply that I bought at Lowe’s . The sideboard that the TV mount is screwed into is the same five eights inch ply. The material is automotive carpet that I bought from an automotive parts store out here called O’Reillys. The carpet is the easiest part. You get 3M spray adhesive, spray the plywood, and stick the carpet on… it’s awesome.

    And then the audio and video is switched from the main AV system in the bus so I bring my iPad out and can select whatever I want to see with the iPad. I ran a new cat5 down to the bay which I use with my switcher to send video to the TV. The switcher encodes HDMI to HDBaseT which makes it easier to run over a cat5 cable. Though…. Not gonna lie…. I wish I just ran a 40′ hdmi cable down there. The network thing has lots of delays and drops. Anyway…. If you have more questions… Just ask!

  • Archived

    Member
    December 30, 2016 at 8:47 pm

    what kind of hdbase t do you have running there? There shouldn’t be delays.

    Im assuming by delay you mean a lip sync issue?

    if so, on video sources you could use the optical output from the tv (to grab audio coming from the video switcher) and the convert it back to analog – (with a d/a converter) and the plug that into the car radio.

    Of course that only works if you have a analog input available on the car radio.

    A long hdmi from your switcher would not have made this problem any better. The issue exists because of how the audio is being brought in to the car radio.

    On video drops. Check the rj45 connectors the smallest crimp issue can cause dropouts and such. Also if a non shielded cat5 was used and runs next to a lot of power. It can get have noise induction that can also cause this issue.

    if you let me know what hdbase t units you ran I might be able to tell you if there is any issue there.

    Over the the years I have found some that work really well, but there are times we have to add additional items to get everythinghappy.

    Love the lights! And – gorgeous coach… that blue is striking!!

    Mike

  • Charlie

    Member
    December 31, 2016 at 10:40 am

    Looks Good ! You might want to add a Strap to secure the TV for Transit. Or a protective pad to the inside of Your Bay door for Protection ? I like the Master Switch to turn everything off !

Page 1 of 2

Log in to reply.